
Meta Pixel Consent Mode ensures your website complies with privacy laws like GDPR and CCPA by adjusting tracking based on user consent. Using commands like fbq('consent', 'revoke') stops tracking until users opt in, while fbq('consent', 'grant') reactivates it. This approach balances user privacy with effective ad tracking.
Key Steps to Set Up:
-
Default to No Tracking: Add
fbq('consent', 'revoke');before Pixel initialization. -
Update on User Action: Use
fbq('consent', 'grant');when users accept cookies. - Integrate with GTM: Use "Consent Initialization" triggers to manage tracking dynamically.
Tools Needed:
- Meta Pixel ID: Create one in Meta Events Manager.
-
Website Access: Insert Pixel code in your
<head>or CMS. - Consent Management Platform (CMP) or GTM: Display consent banners and handle preferences.
Testing:
- Use Meta Events Manager to verify events.
- Check browser developer tools to confirm no tracking occurs without consent.
By following these steps, you can respect user privacy while maintaining accurate ad performance.
Using Meta Ads with Consent Mode in GTM
sbb-itb-d8a1e45
What You Need Before Getting Started
Getting consent management right starts with preparation. Before diving into configuration, make sure you have your Meta Pixel ID, access to your website, and the right consent tools in place. A solid setup avoids unnecessary delays and ensures a smoother process for implementing Meta Pixel Consent Mode.
Meta Pixel ID and Website Access
The Meta Pixel ID is your starting point. You can create one in Meta Events Manager by selecting "Connect Data" and choosing the Web option. Without this ID, you won't be able to configure consent mode.
You'll also need edit access to your website's <head> section to insert the Pixel base code. If you're using a CMS like WordPress or Shopify, ensure you have admin access to add the code through their interfaces. Additionally, if your site uses a Content Security Policy, make sure to allow scripts from https://connect.facebook.net.
For those handling manual setups or advanced customizations, having a developer on hand is a good idea. Before jumping into manual work, check Meta Events Manager for available "Partner Integrations." Platforms such as Shopify and WordPress often offer tools that can automate parts of the Pixel and consent setup, saving you time and effort.
Once your Pixel ID and website access are sorted, set up a Consent Management Platform (CMP) or Google Tag Manager (GTM) to manage user consent effectively.
Consent Management Platform or Google Tag Manager
A Consent Management Platform (CMP) is essential for displaying consent banners and capturing visitors' preferences. This step is critical for meeting GDPR and CCPA requirements. To put this into perspective, in 2024, European data protection authorities issued over €2.92 billion in GDPR fines. Among those, Swedish pharmacy chains were fined €15 million for using the Meta Pixel without obtaining proper user consent.
Alternatively, Google Tag Manager (GTM) simplifies consent management. It uses "Consent Initialization" triggers to handle consent states efficiently and reduce timing errors, known as race conditions. As Simo Ahava, an expert in GTM, explains:
"Setting defaults to 'denied', in my opinion, is the most elegant and most consistent approach. By relying solely on Update calls, you eliminate possible race conditions".
To make the most of GTM, ensure you have administrative or editor-level access. This access allows you to enable the "Consent Overview" feature and set up the necessary triggers for managing consent seamlessly.
How to Set Up Meta Pixel Consent Mode
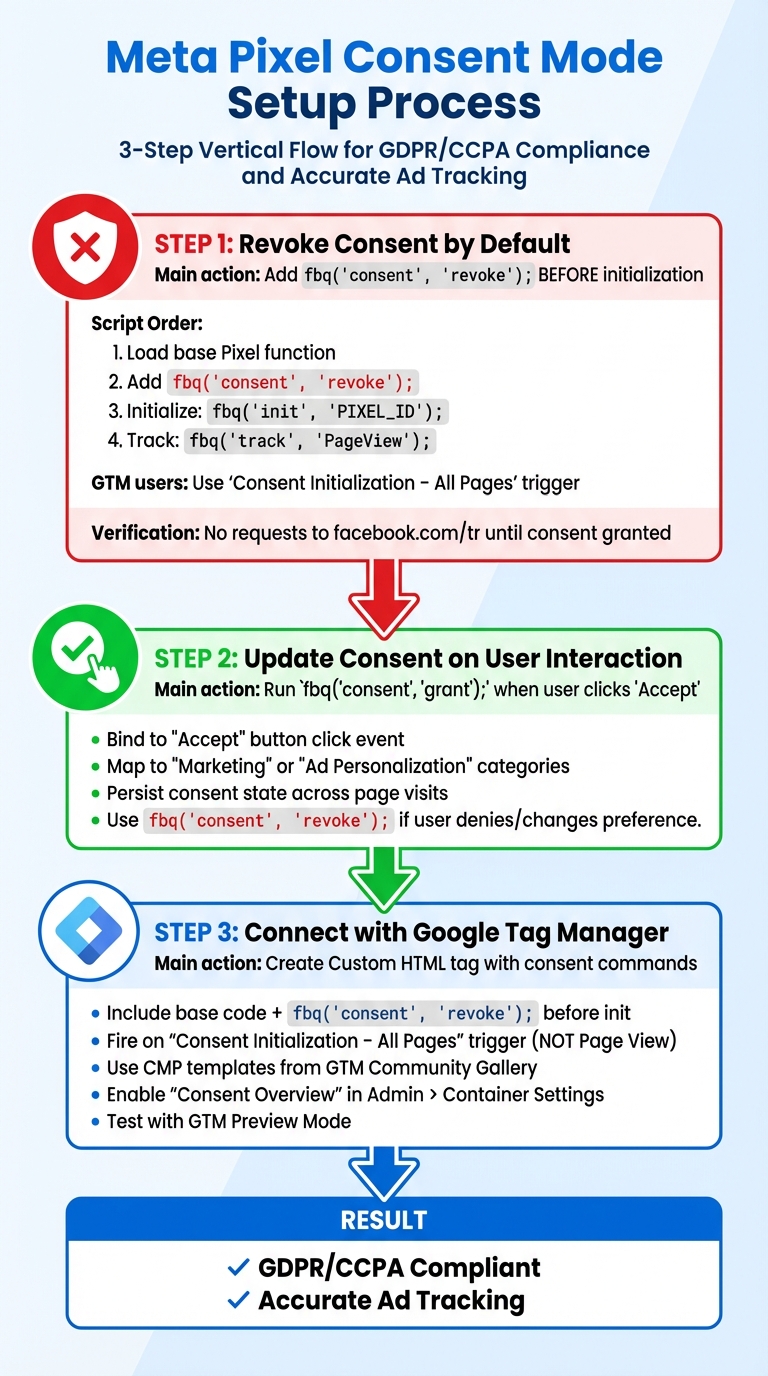
Meta Pixel Consent Mode Setup Process - 3 Steps to GDPR Compliance
To set up Meta Pixel Consent Mode, you'll need to take three main steps: revoke consent by default, update consent when users interact with your banner, and link everything through Google Tag Manager (GTM). These steps help you respect user privacy and comply with GDPR rules.
Step 1: Revoke Consent by Default
Start by adjusting the Meta Pixel code so that tracking is blocked until users grant consent. You can do this by adding the line fbq('consent', 'revoke'); before the initialization call in your Pixel script. This ensures that no Pixel events fire and no marketing cookies are set until consent is explicitly given.
Your Pixel script should follow this order:
- Load the base Pixel function.
- Add
fbq('consent', 'revoke');. - Initialize the Pixel with
fbq('init', 'PIXEL_ID');. - Track the page view with
fbq('track', 'PageView');.
If you're using Google Tag Manager, place this script in a Custom HTML tag and configure it to fire on the Consent Initialization – All Pages trigger.
"You must add the following line to your Meta Pixel script before initializing the Pixel. This ensures tracking is disabled until CookieHub applies the correct user preference: fbq('consent', 'revoke');" – CookieHub Support
To verify, check that no requests are being sent to facebook.com/tr until consent is granted.
Step 2: Update Consent When Users Interact
Once the default settings are in place, you need to dynamically update the consent state based on user actions. For example, if a user clicks "Accept" on your consent banner, run the command fbq('consent', 'grant'); immediately.
To do this, bind the fbq('consent', 'grant'); command to the "Accept" button's click event. This ensures that all subsequent Pixel events align with the user's consent choice. Most consent platforms map user preferences to categories like "Marketing" or "Ad Personalization".
"Use the following API to pause sending Pixel fires to Facebook, and once consent is granted, fire Pixel events... Once affirmative consent has been granted: fbq('consent', 'grant');" – Meta Developers
Make sure the user's consent state persists across all page visits. If a user later denies consent or changes their preference, you should call fbq('consent', 'revoke'); again to stop tracking for that session.
Step 3: Connect Meta Pixel with Google Tag Manager
To streamline everything, integrate your Meta Pixel and consent commands into Google Tag Manager. GTM simplifies the process by centralizing your Pixel code and consent management.
Create a Custom HTML tag in GTM that includes the Meta Pixel base code with the fbq('consent', 'revoke'); command added before initialization. This tag should fire on the Consent Initialization – All Pages trigger, not the standard "Page View" trigger. Using the "Consent Initialization" trigger ensures the Pixel doesn't fire prematurely.
"It is important to choose the trigger type Initialization. If you choose Page View, Meta pixel may not fire at all or fire randomly." – CookieScript
Many Consent Management Platforms offer pre-built templates in GTM's Community Template Gallery, which can automatically handle communication between your consent banner and GTM's consent state. To monitor how consent is applied, activate GTM's "Consent Overview" feature (Admin > Container Settings). Use GTM's Preview Mode to confirm that fbq('consent', 'revoke') runs before any PageView events fire.
How to Test Your Setup
Once you've completed the configuration steps, it's time to test whether consent commands are working properly. This ensures the Pixel respects user consent settings. You can use tools like Meta Events Manager and your browser's developer tools to check everything is functioning as it should.
Check Events in Meta Events Manager
Head to the Test Events tab in Meta Events Manager to monitor events triggered on your website in real time. Open your site in another browser window and simulate key user actions, such as viewing a product, adding items to a cart, or completing a purchase. When events are triggered correctly, they’ll show up instantly with a green status icon. Each event will also indicate whether it originated from the "Browser" (Pixel) or "Server" (via the Conversions API).
Keep an eye on the Event Match Quality (EMQ) score, which ranges from 1 to 10. Aiming for a score of 6.0 or higher can help improve ad attribution and optimization. While events usually appear in the Events Manager within 20 minutes, the Overview tab provides a summary of the total events received and flags any discarded due to consent policies.
For an extra layer of verification, install the Meta Pixel Helper Chrome extension. This tool helps confirm the Pixel code is present and working by showing a badge with the number of Pixel events fired on each page.
Use Browser Developer Tools and GTM Preview Mode
Beyond Meta Events Manager, browser developer tools and Google Tag Manager (GTM) Preview Mode can help verify your setup. Start by opening the Network tab in your browser’s developer tools. Before consent is granted, you shouldn’t see any Pixel requests to facebook.com/tr. After granting consent, refresh the page and confirm that these requests are now being sent.
If you're using GTM, launch Google Tag Manager Preview Mode by entering your site’s URL in Google Tag Assistant (make sure to use Chrome with the Tag Assistant Companion extension). Select the first "Consent" event in the Summary section and check that "On-page Default" values, such as ad_storage, are set to "Denied". After interacting with your cookie banner, select the most recent "Consent" event and confirm the "On-page Update" column reflects the updated state as "Granted".
The "Tags" tab in GTM Preview Mode shows which tags have fired or been blocked. Click on the Meta Pixel tag to confirm it was correctly blocked when consent was denied and fired after consent was granted.
"Before consent (or under Private/Balanced), your Network tab should not show Meta Pixel requests initiated by granted consent." – Hu-manity.co
Finally, check the browser console for any JavaScript errors that might interfere with consent updates. Also, ensure that ad blockers or browser privacy settings aren’t disrupting Pixel requests.
Fixing Common Problems
When setting up Meta Pixel, you might encounter issues like events not firing, incorrect consent states, or conflicts with your Consent Management Platform (CMP). Let’s break down how to identify and resolve these common problems.
Events Not Firing
If your Meta Pixel events aren’t appearing in Events Manager, the issue is often triggering errors in Google Tag Manager (GTM). A common mistake is setting the Meta Pixel tag to fire on the "Page View" trigger instead of the "Initialization - All pages" trigger. This can result in the Pixel firing inconsistently or not at all, especially after page reloads.
Here’s how to troubleshoot:
- Check Tag Order: Ensure the consent default setup happens during initialization to prevent timing-related errors.
- CMP or GTM Blocking: Some settings may block the Meta Pixel tag until a user interacts with the consent banner. Meta Pixel Consent Mode is designed to load the script first and adjust based on consent signals. Remove any "Blocking" or "Exception" triggers in GTM, and confirm that "Additional Consent Checks" are either "Not set" or "No additional consent required".
| Issue | Likely Cause | Recommended Fix |
|---|---|---|
| Pixel not firing at all | Wrong GTM Trigger | Change trigger to "Initialization - All pages" |
| Random firing/Missing events | Consent set too late | Ensure consent is called before fbq('init') |
| "Consent tab empty" in Debugger | Tag is blocked | Review CMP settings to unblock Google/Meta tags |
| Events fire but no conversions | Missing parameters | Add value, currency, and content_ids to event code |
If the issue persists, check your consent states for further troubleshooting.
Wrong Consent States
Incorrect consent states can also interfere with tracking. If the consent state in debugging tools doesn’t match user selections, timing issues are often the cause. When tags read the consent state too early, errors may appear in Tag Assistant.
Here’s how to fix it:
- Use Google Tag Assistant to review the "Consent" tab. Look at the "On-page Default" and "On-page Update" columns.
- Confirm that the consent default is set during "Initialization", not after the page starts loading.
- Ensure proper script order in GTM: Meta Pixel Consent Mode (Initialization) → Consent Banner (Consent Initialization) → Other scripts/Page View events.
- Add
fbq('consent', 'revoke')to your header script before initialization. - Double-check regional settings. For example, setting a "denied" default in a region without a consent banner will block tracking permanently for users who can’t provide permission.
Consent Management Platform Conflicts
Conflicts between your CMP and Meta Pixel often arise due to improper timing. If the Pixel script is blocked until consent is granted, tracking won’t function correctly. Instead, the script should load first, with its behavior controlled by fbq('consent', 'revoke') or fbq('consent', 'grant') commands.
To resolve this:
-
Adjust CMP Timing: Asynchronous CMP loading can delay consent signals. Add the
wait_for_updateparameter (e.g.,wait_for_update: 500) to your consent default command. This gives the CMP 500 milliseconds to provide the correct status before tags fire. - Set Proper GTM Triggers: Ensure your CMP tag fires on the Consent Initialization - All Pages trigger and your Meta Pixel tag fires on the Initialization - All Pages trigger.
Conclusion
By carefully setting up Meta Pixel Consent Mode, you can achieve both compliance with privacy regulations and maintain effective ad performance. This configuration helps protect your business from regulatory risks while ensuring accurate data collection for campaigns. It aligns with major privacy laws like the General Data Protection Regulation (GDPR) and updated state privacy laws, allowing you to meet legal standards without compromising on reliable ad insights.
The steps are simple: begin by calling fbq('consent', 'revoke') before initializing your Pixel, adjust consent settings based on user actions, and verify event tracking using Meta Events Manager and browser tools. When done correctly, this setup can lead to high conversion modeling accuracy.
"Meta Consent Mode works with your Consent Management Platform (CMP) to respect a user's privacy choices while still providing aggregated insights for your advertising campaigns." - Secure Privacy
Additionally, use the Events Manager to monitor your Event Match Quality score - aiming for a score of 6.0 or higher ensures optimal performance. Regularly reviewing your setup is essential to maintain tracking accuracy as privacy laws continue to change.
Transparent consent practices not only build user trust but also contribute to better business outcomes. A well-executed setup strikes the perfect balance between respecting user privacy and achieving advertising success.
FAQs
What happens to Meta Pixel events before consent?
Before a user gives their consent, Meta Pixel events stay inactive, meaning no data is collected or processed. However, once consent is granted for certain purposes, the Pixel activates automatically and starts tracking based on the user’s preferences. This approach ensures compliance with privacy laws while honoring user decisions.
How do I connect my cookie banner to fbq consent?
To link your cookie banner with fbq consent, include fbq('consent', 'revoke'); in your Meta Pixel script before initializing the Pixel. This ensures tracking is paused until the user gives their consent. When the user accepts cookies, your consent tool should trigger fbq('consent', 'grant');, allowing tracking to resume. Double-check that your setup is correct so any changes in consent are reflected in the Pixel's behavior seamlessly.
How can I confirm the Pixel is truly blocked?
To determine if the Meta Pixel is blocked on your site, you can use the Meta Pixel Helper Chrome extension. Here's how:
- When you visit your site, check if the extension's icon turns blue. If it doesn’t, it means the Pixel isn’t firing on that page.
- For additional clarity, refer to troubleshooting guides. These can help you pinpoint common issues and confirm whether the Pixel is blocked as intended.
These steps are an easy way to verify the Pixel's status on your website.
0 comments