
Want to turn website visitors into paying customers? Meta Pixel helps you retarget Instagram ads to people who've already interacted with your brand. By tracking actions like page visits, cart additions, and purchases, you can create hyper-specific audiences for your campaigns. Retargeted users are 43% more likely to convert, making this strategy a must for boosting sales.
Here’s what you’ll learn:
- How Meta Pixel tracks user behavior for Instagram retargeting.
- Steps to install and verify the Pixel on your website.
- Ways to build Custom Audiences using website and Instagram engagement data.
- Tips to create effective retargeting ads and optimize performance.
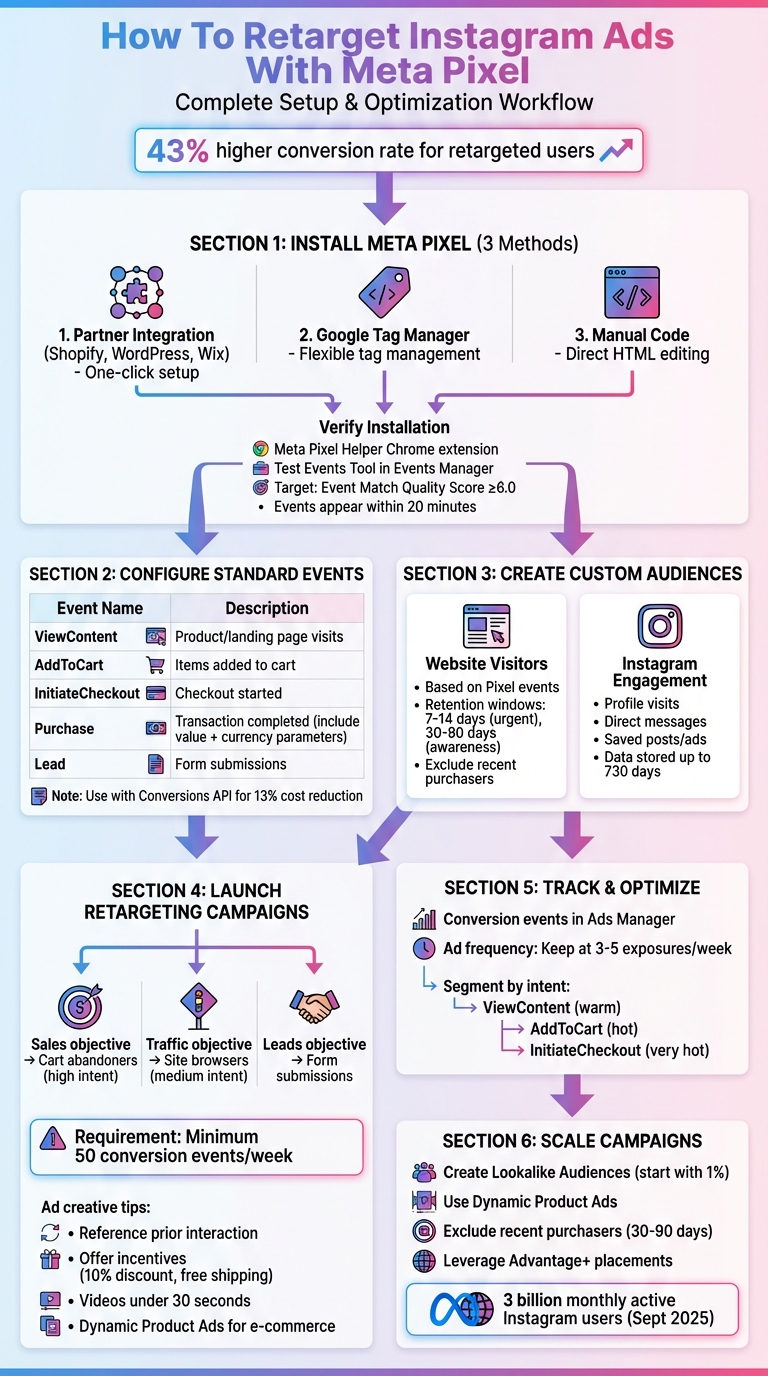
Complete Meta Pixel Setup and Instagram Retargeting Workflow
Installing and Setting Up Meta Pixel

To start building retargeting audiences, you'll need to install the Meta Pixel. There are three ways to do this, and the best method depends on your website platform and how comfortable you are with technical tasks. If you're using platforms like Shopify, WordPress, or Wix, you can skip coding altogether by using their built-in integrations. For example, on Shopify, go to the "Facebook & Instagram" sales channel and look for "Share data settings". If you're familiar with Google Tag Manager, you can add the pixel code without touching your website's source files. For those who prefer a manual installation, copy the base pixel code from Events Manager and paste it into your site's header section, just above the closing </head> tag on every page. If you're not confident editing HTML, consider getting help from a developer. And if you're switching from manual installation to a partner integration, don’t forget to remove the old pixel code to avoid duplicate tracking.
3 Ways to Install Meta Pixel
- Partner Integration: Platforms like Shopify, WordPress, and Wix offer simple, one-click setups.
- Google Tag Manager: Ideal for users comfortable with tag management, offering more flexibility.
- Manual Code: Suitable for any website but requires direct HTML editing.
After installation, confirm that the pixel is tracking properly to avoid any data gaps.
How to Verify Meta Pixel Installation
Once you’ve set up the pixel, use the Meta Pixel Helper Chrome extension to ensure it’s working. This tool shows a badge with the number of events being fired on each page. Clicking the badge provides troubleshooting details. Another option is the Test Events Tool in Events Manager, which lets you see events as they occur in real-time while navigating your site. Focus on key pages like your homepage, product pages, cart, and checkout to confirm the pixel is firing correctly. If you’re using both the Meta Pixel and Conversions API, aim for an Event Match Quality score of 6.0 or higher - this can help reduce your cost per action. Events should typically appear in Events Manager within 20 minutes of being triggered. Once verified, you’re ready to set up event tracking.
Setting Up Events and Parameters
With the base pixel code in place, you’ll need to configure standard events to track user actions like viewing content, adding items to a cart, or completing a purchase. The Event Setup Tool in Events Manager allows you to do this without coding - just click through your site and choose buttons or URLs to track. For manual setups, insert event code snippets into the appropriate pages. For example, the Purchase event code looks like this:
fbq('track', 'Purchase', {value: 0.00, currency: 'USD'});.
Including the value and currency parameters for purchase events is essential for calculating your return on ad spend. If you’re planning to run catalog ads on Instagram, ensure your ViewContent and AddToCart events include content_ids and content_type parameters.
| Standard Event | Website Action | Event Code |
|---|---|---|
| ViewContent | Visiting a product or landing page | fbq('track', 'ViewContent'); |
| AddToCart | Adding an item to a shopping cart | fbq('track', 'AddToCart'); |
| InitiateCheckout | Starting the checkout process | fbq('track', 'InitiateCheckout'); |
| Purchase | Completing a transaction | fbq('track', 'Purchase', {value: 0.00, currency: 'USD'}); |
| Lead | Submitting a form or signing up for a trial | fbq('track', 'Lead'); |
"The Conversions API helps improve the performance and measurement of your Meta ad campaigns by working with your Meta Pixel." - Meta Business Help Center
Using the Meta Pixel alongside the Conversions API ensures more accurate tracking, especially when browser-based methods are blocked by ad blockers or privacy settings. This dual setup helps you collect as much data as possible to refine your retargeting efforts.
sbb-itb-d8a1e45
Creating Retargeting Audiences in Meta Business Manager
Once your pixel is installed and events are configured, the next step is to create tailored audiences in Meta Business Manager. Head to Meta Ads Manager, navigate to Audiences, click Create Custom Audience, and choose either "Website" or "Instagram account" as your audience source.
Building Website Visitor Audiences
With your Meta Pixel now tracking user actions, you can start defining specific audience segments based on behavior. When setting up a website audience, you can include users who meet either any or all of the conditions you specify. For example, you might target users who triggered the AddToCart event while excluding those who completed a Purchase in the last 30 days. You can further refine these audiences by adding event parameters, such as subscription type or product category.
Focus on key behaviors like visiting specific product pages, abandoning their checkout, or exploring your pricing page. The best part? Meta automatically keeps these audiences up-to-date by adding new visitors and removing those who no longer fit within your retention window.
Building Instagram Engagement Audiences
To complement your website data, you can also target audiences based on Instagram interactions. After selecting "Instagram account" as your source, choose from various engagement events, such as:
-
Profile visits (
ig_business_profile_visit) -
Direct messages sent (
ig_user_messaged_business) -
Saved posts or ads (
ig_business_profile_ad_saved)
For the broadest reach, use the ig_business_profile_all option, which includes anyone who has visited your profile or interacted with your content or ads. Instagram engagement data can be stored for up to 730 days, giving you flexibility in how you structure your campaigns.
Consider creating separate audiences for different levels of intent. For example, users who messaged your business may represent high-value leads, while casual engagers like profile visitors might require softer messaging.
Choosing Time Windows for Audience Data
The retention window determines how long a user stays in your audience after completing an event. Shorter windows, like 7 to 14 days, are ideal for time-sensitive campaigns, such as abandoned cart retargeting, where the intent to purchase is still fresh. On the other hand, longer windows - 30 to 90 days - work better for campaigns aimed at building brand awareness or for products with a longer decision-making process.
Experiment with different retention periods to find what works best for your goals. For instance, a 60-day window might be suitable for high-ticket items, while a tighter 7-day window could be more effective for flash sales. Once you've finalized the criteria and retention period, give your audience a clear, descriptive name (e.g., "Cart Abandoners – Last 14 Days") and hit Create Audience. This level of segmentation ensures your retargeting efforts align closely with user intent, boosting your campaign's efficiency.
Setting Up and Launching Retargeting Campaigns
Once you've identified your target audiences, the next step is to put your retargeting strategy into action. To get started, head over to Meta Ads Manager. Click Create and choose a campaign objective. For users who have shown strong purchase intent - like those who abandoned their carts - select the Sales objective. If you're trying to reconnect with users who visited your site but didn’t interact much, go with the Traffic objective. Keep in mind, you’ll need at least 50 conversion events per week to effectively optimize for conversion-based goals.
Choosing Your Campaign Objective
The objective you select impacts how your ads are optimized and delivered. The Sales objective is ideal for audiences who’ve demonstrated clear intent to purchase, such as adding items to their cart or starting the checkout process. If your goal is to reengage visitors who browsed your site without taking further action, the Traffic objective is a better fit. For campaigns focused on collecting information - like form submissions or consultation sign-ups - opt for the Leads objective. Aligning your objective with your audience’s intent ensures your ads resonate and encourage the right actions.
Configuring Ad Sets for Retargeting
When setting up your ad sets, choose Website as the conversion location to fully utilize your Meta Pixel data. In the audience section (sometimes labeled as "Advantage+ audience"), select the retargeting segments you’ve built - like "Cart Abandoners – Last 14 Days" or "Product Page Viewers – 30 Days." To refine your targeting, use the Exclude feature to filter out users who have already converted, such as excluding "Purchasers – Last 30 Days" in a cart abandonment campaign.
By default, Advantage+ placements will distribute your ads across Instagram Feed, Stories, Reels, and other placements. However, if you’ve created vertical 9:16 videos specifically for Stories or Reels, switching to manual placements ensures your content displays correctly without awkward cropping. This small adjustment can make a big difference in how your ads are perceived.
Creating Effective Retargeting Ad Creatives
Your ad creative should directly reference the user’s prior interaction, but avoid coming across as overly aggressive. For cart abandoners, try messaging like: "Still thinking about that [product name]?" and offer an incentive such as free shipping, a 10% discount, or a limited-time bonus. Use high-quality images that showcase the product in relatable, real-world settings. If you’re using video, grab attention within the first three seconds with dynamic visuals and captions for silent viewers. Keep videos under 30 seconds to maintain engagement, whether they’re shown in the Feed or Stories.
Make sure your primary text starts with a strong hook to avoid being cut off, and pair it with a headline that emphasizes a clear benefit - like "Get clearer skin in 30 days." Adjust your messaging based on audience behavior: share educational content for general visitors, highlight product benefits for users who browsed specific items, and offer direct discounts to those who added products to their cart.
For e-commerce businesses, connecting a product catalog allows you to run Dynamic Product Ads, which automatically display items each user viewed or added to their cart. Always direct users to a relevant landing page, not a generic homepage, to improve their experience. Finally, exclude recent purchasers (from the last 7–30 days) to avoid ad fatigue and wasted spending. Once your campaign is live, monitor its performance and make adjustments as needed to maximize results.
Tracking and Optimizing Retargeting Performance
With both the Meta Pixel and Conversions API (CAPI) in place, it's time to focus on tracking and optimizing your retargeting efforts. These tools work together to provide accurate data: the Pixel tracks critical user actions, while CAPI sends event data directly from your server to Meta, bypassing issues like browser errors and ad blockers. Using both tools together helps reduce costs and improves the accuracy of your tracked purchase events.
Tracking Conversion Events
The Meta Pixel tracks standard events like AddToCart, InitiateCheckout, and Purchase. These events appear in the Results column of Meta Ads Manager and in Events Manager. To ensure everything is working as intended, use the Test Events Tool in Events Manager. Simply enter your website URL, interact with your site (e.g., add a product to the cart), and check if events register in real time. For additional troubleshooting, check the Diagnostics tab for setup alerts.
If your campaign requires tracking actions beyond the standard events, you can set up custom events using the fbq('trackCustom') function. Just make sure event names are under 50 characters. For best results, aim for at least 50 conversion events per week at the ad set level. Use the data from these events to fine-tune your campaign creative and strategy.
How to Optimize Retargeting Campaigns
Start by identifying any issues in your sales funnel. For example, if you notice high clicks but low conversions, your landing page might need improvement. If users frequently add items to their cart but don’t complete their purchase, there may be friction in the checkout process.
Segment your audience based on intent:
- Users who triggered
ViewContentare warm leads. - Those who recorded
AddToCartare hot leads. - Users who initiated checkout are very hot leads.
Tailor your creative and bidding strategies to match these levels of intent. If your conversion volume is too low for Meta’s algorithm to optimize effectively, consider focusing on higher-funnel events like ViewContent to gather more data. Once you have enough signals, switch back to optimizing for Purchase. Keep an eye on ad frequency - showing the same ad more than 3–5 times per week to a single user can lead to ad fatigue. When your campaigns are performing well, use these insights to scale effectively.
Scaling Retargeting Campaigns with Data
Once you’ve identified an audience that delivers consistent results, consider creating Lookalike Audiences based on Pixel-tracked converters. Start with a 1% lookalike for precise targeting, and then experiment with broader percentages, such as 3% or 5%, while monitoring your ROI. Shift your budget toward ad sets that drive key actions like Purchase or Lead.
For e-commerce, Dynamic Product Ads are a great way to scale. These ads automatically display the exact products users viewed or abandoned, making scaling personalized and efficient without requiring extra effort. To avoid wasting budget, exclude recent purchasers (those who converted within the last 30–90 days).
Lastly, take advantage of Advantage+ placements to let Meta optimize ad delivery across Instagram Feeds, Stories, and Reels. Before scaling your budget, use tools like the Meta Pixel Helper Chrome extension to verify your setup. With data-driven adjustments, scaling becomes a smoother process.
Conclusion
With proven tracking methods and audience targeting strategies in place, your Instagram retargeting setup is ready once you've installed the Pixel using your preferred method and verified its functionality with the Meta Pixel Helper. To get the most out of Meta's algorithm, make sure you’ve set up standard events to optimize for conversions.
Break down your audience by intent - create distinct Custom Audiences for those who browsed your site, viewed product pages, or abandoned their carts. Tailor your ads and offers to match the interest levels of each group. Don’t forget to exclude recent purchasers to save your budget and aim for an ad frequency of 3–5 exposures per week to avoid overwhelming your audience. These steps will help fine-tune your strategy and expand your reach effectively.
"The fastest way to improve Instagram ad performance is to stop optimizing on clicks and start optimizing on outcomes." – AdSpyder
Use Meta Pixel data alongside the Conversions API (CAPI) to identify and fix conversion issues. Once your data is accurate, create Lookalike Audiences from your best-performing segments. Combining Meta Pixel with CAPI can reduce your cost per result by around 13%. With Instagram boasting 3 billion monthly active users as of September 2025, retargeting offers a powerful way to reconnect with potential customers and boost your marketing ROI.
FAQs
Do I need Meta Pixel, Conversions API, or both?
To make the most of retargeting Instagram ads, you’ll need two key tools: the Meta Pixel and the Conversions API. Here's how they work together:
- Meta Pixel: This tool tracks how visitors interact with your website, including their behavior and conversions. It’s essential for building retargeting audiences based on user activity.
- Conversions API: By sending data directly from your server, the API improves tracking accuracy, which has become increasingly important after the iOS 14.5+ privacy updates.
Using both tools in tandem allows for more precise data collection, giving you the edge in creating retargeting campaigns that perform better.
Why aren’t my Pixel events showing up in Events Manager?
If your Pixel events aren’t showing up in Events Manager, several issues could be at play. One common problem is when the Pixel is implemented within an iframe, which requires a manual code adjustment. Start by ensuring you have admin access to the Pixel to make necessary changes.
Next, check for any script conflicts that might interfere with the Pixel's functionality. To troubleshoot, use tools like Meta Pixel Helper or your browser's developer tools. These can help you confirm whether the Pixel is set up correctly and verify if events are firing as expected.
How do I choose the best retargeting audience time window?
The best retargeting time frame hinges on your objectives and how your audience behaves. For instance, a shorter window, like 7 days, is great for targeting recent visitors or encouraging impulse buys. On the other hand, longer windows, up to 30 days, are better suited for products that require more time for decision-making. To pinpoint the ideal timing, experiment with various timeframes and closely monitor performance metrics to see what works best for your campaigns.
0 comments