
Want to get your ads to the top of Google search results? Here’s how to do it.
Google Ads Search campaigns allow you to target users actively looking for your products or services. By using keywords, Smart Bidding, and Responsive Search Ads (RSAs), you can improve conversions and ROI. Here’s a quick breakdown of what you’ll learn:
- Account Setup: How to create a Google Ads account and configure billing.
- Campaign Creation: Choosing goals, setting budgets, and targeting the right audience.
- Keywords: Selecting, grouping, and optimizing keywords for better performance.
- Ad Copy: Writing headlines and descriptions that grab attention.
- Tracking: Setting up conversion tracking to measure success.
- Optimization: Adjusting bids, refining keywords, and improving ad performance.
Success stories like tails.com (182% more trial sign-ups) and HUGO BOSS (2.5x ROAS) show how combining these tools can deliver measurable results. Whether you’re new to Google Ads or looking to fine-tune your strategy, this guide walks you through every step to run effective campaigns.
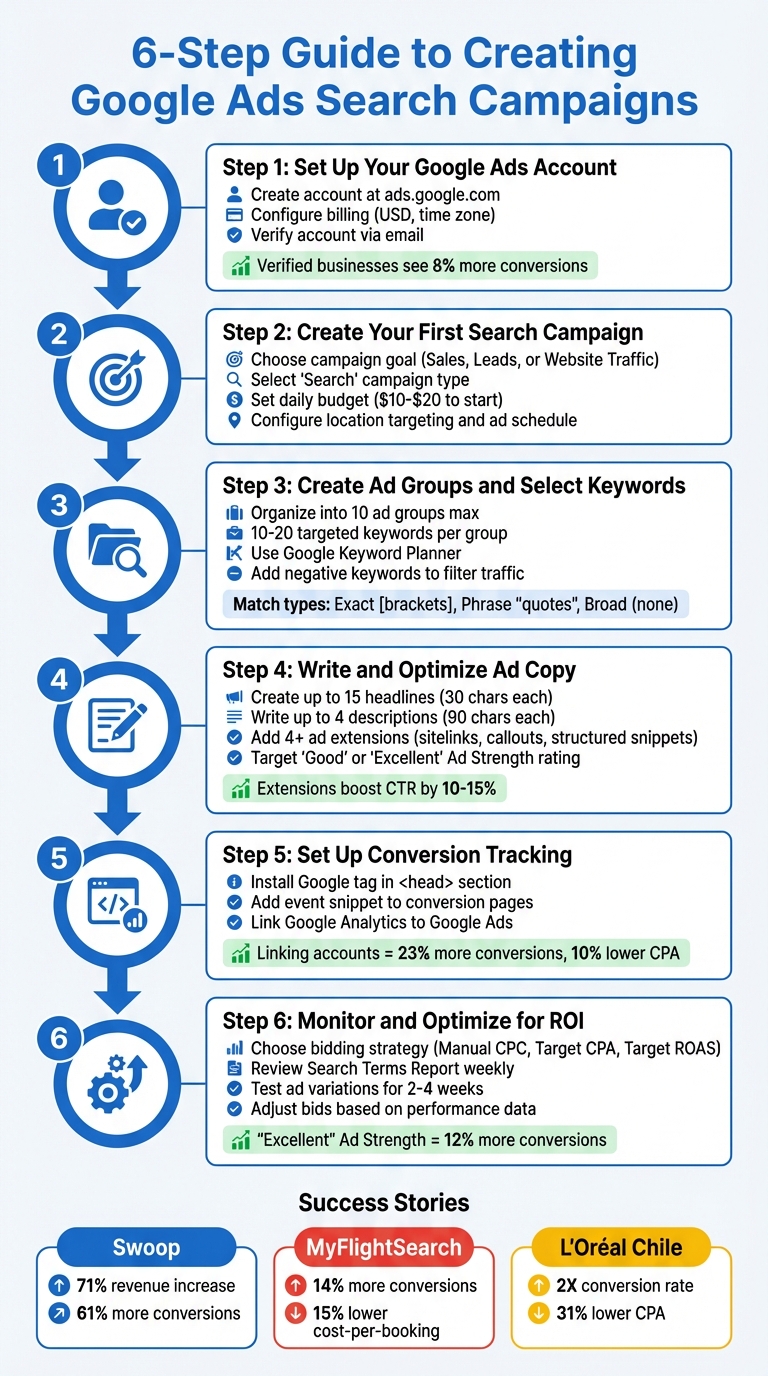
6-Step Guide to Creating Google Ads Search Campaigns
Step 1: Set Up Your Google Ads Account
Create a Google Ads Account
To start, you'll need a standard Google Account (like Gmail). Head over to ads.google.com and follow the prompts to provide your business name and website URL. Keep in mind, new accounts don’t allow URLs in the account name - stick to a straightforward business name.
You can also connect assets like your YouTube channel or Google Business Profile. This helps Google suggest keywords and headlines that align with your business details.
Next, configure your billing settings. Set your billing country to the United States, choose USD as your currency, and select a time zone. Keep in mind that your time zone is permanent, so it will impact reporting, statistics, and billing cycles. Choose an account type - Organization (default for businesses) or Individual (for tax purposes). Then, add your payment method, whether it’s a credit/debit card, PayPal, or a direct bank account link. Be aware that Google might place a temporary authorization hold on your card, but this usually clears within a week.
"Your billing country determines the billing options that are available for your location and currency." - Google Ads Help
If you have a promotional code or voucher, enter it in the "Introductory offer" field during billing setup to unlock ad credits. You can skip the initial campaign setup for now and focus on finalizing your account dashboard to confirm all administrative settings before spending any money.
Once your account and billing details are set, verify everything to activate your dashboard.
Verify and Complete Account Setup
Verification is a critical step that prepares your account for tools like conversion tracking. After submitting your details and accepting Google’s terms, check your Gmail inbox for a confirmation email. If you don’t see it, check your spam folder or confirm that your email was entered correctly.
Once verified, log in to your Google Ads dashboard. This is where you’ll manage campaigns, track performance, and tweak settings. Before running any ads, set up conversion tracking to measure your results effectively. You can also invite other users to help manage the account once the setup is complete.
Make sure your business name matches your verified legal name or domain name. Any discrepancies can lead to account disapproval. Businesses that display a verified logo and name with their ads tend to see an average of 8% more conversions without an increase in cost per conversion.
sbb-itb-d8a1e45
Step 2: Create Your First Search Campaign
Choose Campaign Goals and Type
Start by clicking + New Campaign and pick a goal that aligns with your business objectives. You can choose from Sales (encouraging purchases online, in-app, by phone, or in-store), Leads (to spark interest and gather contact details), or Website Traffic (to drive visitors to your website). If you want complete control over your campaign setup, select "Create a campaign without a goal's guidance" - just ensure you’ve set up at least one conversion goal.
After selecting your goal, choose "Search" as your campaign type. This ensures your ads appear exclusively on Google’s search results, targeting users actively searching for relevant products or services. Give your campaign a clear, descriptive name, like "Spring_Promo_2026", to keep things organized internally.
Configure Campaign Settings
Next, adjust your campaign settings, starting with ad networks. To focus solely on search results, uncheck the "Display Network" box - this ensures your budget is dedicated to search result pages only.
Set a daily budget that works for you, such as $10–$20, to gather performance data without overspending. Opt for Manual CPC to have direct control over how much you pay for each click.
For location targeting, define specific geographic areas, like focusing on U.S. audiences, and choose the "Presence" option to target users physically in those locations. Set the language to English and schedule your ads to run during peak times when conversions are most likely.
"By targeting specific keywords and demographics, you can connect with potential customers precisely when they're looking for what you have." - Google Ads Help
Once your campaign settings are finalized, you’re ready to move on to organizing ad groups and fine-tuning your keyword strategy.
Step 3: Create Ad Groups and Select Keywords
Organize Campaigns with Ad Groups
Once your campaign settings are ready, the next step is to structure your ad groups for better targeting and relevance. Think of ad groups as focused containers within your campaign, each centered on a specific theme like "flat screen TVs" or "digital cameras." This approach ensures your ads align closely with what users are searching for. Ideally, each ad group should correspond to a single product page or category.
Aim to keep your campaigns streamlined by limiting them to 10 ad groups, each containing 10–20 highly targeted keywords. This setup not only improves organization but also enhances your Quality Score - a Google metric influenced by factors like ad relevance, expected clickthrough rates, and the user experience on your landing page. A higher Quality Score can lead to lower costs per click and better ad placements. To maximize performance, include at least three ads per ad group and enable optimized ad rotation, which prioritizes your best-performing ads.
Select Keywords and Match Types
Use Google Keyword Planner to uncover the keywords your audience is actively searching for. This free tool becomes available after setting up billing and allows you to explore keyword ideas by entering specific product names or even your website URL. Focus on terms that resonate with your customers, such as "hiking boots", rather than full questions, to broaden your reach.
Once you've gathered at least 25 keyword ideas, use the "Organize keywords" feature to group them into relevant ad groups that align with your campaign structure. When setting match types, you can choose from:
-
Exact match: Use brackets, e.g.,
[running shoes], to target searches for that exact term. -
Phrase match: Use quotation marks, e.g.,
"running shoes", to capture searches containing the phrase in order. - Broad match: No formatting needed, allowing your ad to appear for related searches.
Strike a balance between specificity and reach by avoiding overly broad terms (like "wedding") or excessively niche phrases (like "wedding venues for small weddings"). Fine-tune your strategy further by using negative keywords to filter out irrelevant traffic.
Add Negative Keywords
Negative keywords are a powerful way to filter out unwanted traffic, helping you focus your budget on the right audience. For instance, if you sell only dog clothes, adding "cat" as a negative keyword ensures your ads won't show up for unrelated searches. Regularly check the Search Terms Report to identify irrelevant search terms triggering your ads and add them as negatives.
To add a negative keyword, simply place a minus sign (-) before the term (e.g., -free to exclude searches for free products). Keep in mind that negative keywords don't account for close variants, so include synonyms and common variations to fully exclude a topic. You can apply negative keywords at the ad group or campaign level, or even create account-wide lists to cover all campaigns.
With your ad groups and keyword strategies set, you're ready to move on to crafting compelling ad copy in the next step.
Step 4: Write and Optimize Ad Copy
Write Effective Headlines and Descriptions
Your ad copy needs to grab attention, reflect user intent, and drive clicks. With Google's responsive search ads, you can create up to 15 headlines (30 characters each) and 4 descriptions (90 characters each). Google then tests these combinations to find what resonates best with users. The more variations you provide, the better Google can match your ad to user intent.
Start by weaving your top-performing keywords into at least two of your headlines to improve relevance. At the same time, keep three headlines keyword-free to emphasize benefits, features, or unique selling points. For example, if you're advertising hiking boots, pair a keyword-heavy headline like "Waterproof Hiking Boots" with benefit-focused ones such as "Free Shipping Over $50" or "30-Day Returns." Experiment with headline lengths to maximize visibility and test what connects most with your audience.
Always prioritize user benefits over features. Highlight what the customer stands to gain. For example, instead of generic phrases like "Sign up today", create urgency with countdowns like "Sale ends in 3 hours" or add local relevance to your message. Use the two URL path fields to clearly indicate your landing page (e.g., /hiking-boots).
To ensure your ads perform well, aim for an Ad Strength rating of "Good" or "Excellent." Follow Google's dynamic suggestions during ad creation to refine your copy. Real-world examples highlight the impact of this approach: in 2018, Canadian airline Swoop boosted revenue by 71% and conversions by 61% by integrating its best-performing keywords into its responsive search ads. Similarly, MyFlightSearch saw a 14% rise in conversions and a 15% drop in cost per booking by focusing on strong Ad Strength and relevant keywords.
Regularly analyze your campaign-level asset reports to identify underperforming headlines and descriptions. Replace these with new variations inspired by your best-performing assets. Avoid pinning assets to fixed positions unless absolutely necessary, as it restricts Google's ability to test and optimize combinations. This strategy ensures your ad copy aligns seamlessly with your structured ad groups and targeted keywords.
Set Up Ad Extensions
Once your ad copy is ready, take it a step further with ad extensions (now called "assets"). These add extra details to your ad, increasing its size on the search results page without raising your base bid cost. Extensions not only improve visibility but also enhance your Ad Rank. Adding just one extension can boost click-through rates by 10–15%, with some studies even reporting increases of up to 20%.
To get the most out of extensions, aim to set up at least four different types. Here are some examples:
- Sitelinks: These clickable links direct users to specific pages like "Contact Us" or "Sale Items." For an "Excellent" Ad Strength rating, include at least six options, though Google usually displays two or four at a time.
- Callouts: These are short, non-clickable text snippets (under 25 characters) that highlight perks like "Free Shipping" or "24/7 Support."
- Structured snippets: Use these to list specific products, brands, or services. Providing at least four values per header ensures better performance.
Make sure your extension text adds new information rather than repeating what's already in your headlines or descriptions. You can also use advanced settings to fine-tune when certain extensions appear. For instance, schedule call assets during business hours to avoid missed connections, or set start and end dates for promotion extensions to prevent outdated offers from showing. Google limits clicks per impression to two for ads with extensions, so adding multiple extensions carries minimal risk. The algorithm will automatically choose the best combination for each query, so offering a variety of relevant assets increases your chances of standing out.
Step 5: Set Up Conversion Tracking
Install Conversion Tracking Pixels
Conversion tracking helps you understand which clicks lead to actions like purchases, form submissions, or phone calls. For Google Ads, this involves using a site-wide Google tag along with an event snippet on specific conversion pages.
Start by placing the Google tag in the <head> section of every page on your website. This tag sets a cookie to track user actions. Then, add the event snippet to your conversion page - typically a "Thank You" page that appears after a purchase or form submission - to log completed conversions.
If editing your website's code feels overwhelming, Google Tag Manager can simplify the process. Use the "Conversion Linker" tag on all pages, which allows Tag Manager to automatically capture ad click details and store them in first-party cookies. Make sure auto-tagging is turned on so the Google Click Identifier (GCLID) passes to your landing pages without issues.
You can choose from several tracking methods:
- URL-based tracking: Ideal for "Thank You" pages.
- Manual code tracking: Best for tracking specific actions like button clicks.
- GA4 event imports: Useful for bringing in events already tracked in Google Analytics 4.
Once your tags are live, use the Tag Assistant tool to verify that everything is working correctly. Keep in mind that it might take up to 48 hours for conversion data to show up.
You can also adjust the conversion window, which is the time period after an ad click during which a conversion is recorded. The default is 30 days, but you can modify it to suit your sales cycle. Assigning monetary values to conversions can help with advanced bidding strategies. For businesses with longer sales cycles, consider tracking micro-conversions, like "add to cart" actions, to give Google's optimization tools more data to work with.
Once your conversion pixels are active, the next step is linking your analytics data for even better tracking.
Link Google Analytics to Google Ads
When you link Google Analytics to Google Ads, you gain a deeper understanding of your customer journey, from the initial ad click to the final conversion. This integration also improves remarketing campaigns and supports advanced features like Smart Bidding. In fact, advertisers who connect these platforms often see a 23% boost in conversions and a 10% drop in cost per conversion.
To link the accounts, ensure you have the right permissions. Your Google account must have an Administrator or Editor role in Google Analytics and Administrative access in Google Ads. Using the same email for both accounts can streamline the process. In Google Analytics, navigate to Admin, find Product links under the property settings, select Google Ads links, and click Link to choose your ad accounts. Also, confirm that auto-tagging is enabled in Google Ads for seamless data sharing.
Once linked, log in to Google Ads and import key Google Analytics events as conversion actions. This ensures consistent tracking between the two platforms and helps optimize your bidding strategies. Data usually appears in reports within 24 to 48 hours. If you manage multiple ad accounts, you can create up to 400 links per Google Analytics property, giving you plenty of flexibility.
Step 6: Monitor and Optimize Campaigns for ROI
Adjust Bidding Strategies
Your bidding strategy directly impacts your cost-per-click (CPC) and conversion rate, so choosing the right one is critical. The best strategy depends on your business goals and how much control you want over your campaigns.
- Manual CPC: This approach gives you full control over keyword-level bids, making it ideal for low-volume campaigns or when you're just starting out. However, it can be time-intensive and doesn’t take advantage of real-time auction signals that Google's AI can process.
- Maximize Conversions: This strategy uses Google's AI to spend your daily budget to generate as many conversions as possible. While it’s great for maximizing volume, it requires close monitoring to prevent rising costs per acquisition.
- Target CPA (Cost-Per-Acquisition): If you have specific cost-per-lead or sale goals, this strategy automatically adjusts bids to meet them. It requires conversion tracking and a decent amount of historical data - at least 30 conversions in the past 30 days.
- Target ROAS (Return on Ad Spend): Perfect for e-commerce businesses with varying profit margins, this strategy focuses on maximizing revenue rather than conversion volume. For example, 1STOPlighting increased profits by 214% by transitioning to Target ROAS bidding, while L'Oréal Groupe Chile achieved a 2X higher conversion rate and a 31% drop in cost-per-conversion using Maximize Conversion Value.
"AI Max propelled us into new markets, reaching untapped audiences with lower costs, higher conversions, and more relevant ad experiences that significantly boosted engagement." - Nicolás Moya, CMO, L'Oréal Groupe Chile
To make informed decisions, use tools like Bid and Budget Simulators to test "what-if" scenarios. Let your campaigns run for a few weeks before tweaking them again - frequent changes during the learning phase can disrupt the algorithm’s ability to optimize.
| Bidding Strategy | Best Use Case | Pros | Cons |
|---|---|---|---|
| Manual CPC | Full control over keyword bids | Precise budget management | Time-consuming; lacks real-time optimization |
| Maximize Conversions | Spending full budget for conversions | Uses Google AI to optimize auctions | May lead to higher CPAs if not monitored |
| Target CPA | Maintaining specific cost-per-lead | Auto-adjusts bids for target costs | Needs conversion tracking and data |
| Target ROAS | Optimizing for revenue | Focuses on high-value conversions | Requires assigning conversion values |
Refine Keywords and Ad Copy
Once your bidding strategy is set, refining your keywords and ad copy is the next step to improve relevance and performance. The Search Terms Report is your go-to tool for this. It shows the actual queries triggering your ads, helping you identify high-performing terms to add as keywords and low-performing or irrelevant ones to exclude as negatives. Review this report weekly to keep your campaigns on track.
Pay close attention to these metrics:
- Clickthrough Rate (CTR): A CTR below 1% on the Search Network often means your ads aren’t reaching the right audience or your keywords need fine-tuning. Pause underperforming keywords and replace them with more specific alternatives.
- Quality Score: This score, ranging from 1 to 10, reflects expected CTR, ad relevance, and landing page experience. A higher Quality Score can lower your CPC without compromising your ad position.
For ad copy, focus on improving Ad Strength for Responsive Search Ads. Ads rated "Excellent" in Ad Strength typically see a 12% boost in conversions compared to those rated "Poor". To achieve this:
- Include at least one keyword in your headline to enhance relevance.
- Add four unique image assets and three ad extensions (like sitelinks or callouts) to expand your ad’s visibility.
- Use the Segments tool to analyze performance by device or time of day, helping you pinpoint when and where your ads perform best.
Test and Optimize Ad Variations
Testing is crucial to uncover which elements of your ads drive the best results. A/B testing works well here - create multiple ad variations within each ad group, tweaking one element at a time (like the headline or call-to-action). Let the test run for two to four weeks or until you gather enough data to make a solid decision.
Use these tools to guide your optimization efforts:
- Top Movers Report: This highlights campaigns with the biggest changes in clicks, costs, or conversions, helping you spot trends quickly.
- Auction Insights: Compare your impression share and rank against competitors in the same auctions. If competitors consistently outperform you, consider raising bids or improving your Quality Score.
A great example of optimization in action is Swoop, an airline that boosted revenue by 71% and conversions by 61% by incorporating top-performing keywords into its responsive search ads. This demonstrates how ongoing testing and adjustments can lead to significant gains.
Finally, use the Dimensions or Time view to identify peak performance hours. Adjust your ad schedules to increase bids during these high-conversion times, ensuring your budget is spent where it will have the most impact. This approach helps maximize your return on investment.
Google Ads Search Campaign Set Up Tutorial in 2026
Conclusion
Running successful Google Ads Search campaigns hinges on starting with the right setup and committing to ongoing, data-driven improvements. This means implementing accurate conversion tracking, organizing ad groups effectively, and selecting targeted keywords. Without conversion tracking, it’s impossible to know what’s working or how your budget is being spent.
The most successful businesses are those that treat optimization as an ongoing process. For instance, Swoop saw a 71% boost in revenue and a 61% increase in conversions by integrating their top-performing keywords into responsive search ads. Similarly, MyFlightSearch improved conversions by 14% and reduced cost-per-booking by 15% by focusing on achieving "Good" or "Excellent" Ad Strength ratings. These examples highlight how continuous refinement can deliver measurable results.
Start with a solid foundation: ensure your account setup is accurate, use well-structured ad groups with clear themes, and write engaging ad copy with impactful headlines. Include ad extensions for better visibility and begin with Manual CPC bidding to maintain control while gathering performance data. Advertisers who elevate their Ad Strength from "Poor" to "Excellent" can achieve, on average, 12% more conversions, showing how even small adjustments can lead to meaningful improvements.
Keep testing ad variations, adjusting bids based on performance, and aligning your landing pages with ad messaging. Let the data guide your decisions to consistently improve ROI. A focused, disciplined approach can transform your Google Ads Search campaigns into a powerful driver of profitability.
FAQs
How much should I budget per day to start?
When setting up your ad campaigns, start with a daily budget that aligns with your goals and the size of your business. Many businesses kick things off with a range of $10–$50 per day. This allows you to test performance without overspending.
There’s no one-size-fits-all answer for how much to spend - pick a budget that feels manageable, then fine-tune it as you analyze your campaign’s results. Over time, this data will help you make smarter decisions about where to allocate your ad dollars.
When should I switch from Manual CPC to Smart Bidding?
Switch to Smart Bidding when you're looking to leverage automated, AI-powered strategies to focus on goals like conversions or conversion value. To get the most out of it, make sure your campaigns have gathered enough historical conversion data - this helps the system optimize effectively. By automating bids, Smart Bidding can streamline your efforts and potentially boost performance, making it a solid option when you're ready to embrace automation for improved outcomes.
What conversions should I track first?
To make the most of your advertising efforts, begin by tracking conversions that match your specific goals. Pay close attention to essential web activities like purchases, sign-ups, or other meaningful interactions on your site. These actions offer clear, measurable insights into how well your campaigns are encouraging customer engagement. By focusing on these metrics, you can fine-tune your strategies and improve overall performance.
0 comments