Google Ads lead form tracking ensures you know which ads and keywords drive conversions, helping optimize your campaigns and budget. Using Google Tag Manager (GTM), you can track form submissions effectively, whether your forms redirect to a thank-you page or display success messages inline.
Key Steps:
- Set Up Conversion Actions in Google Ads: Define what counts as a lead, assign values, and retrieve your Conversion ID and Label.
- Install a Conversion Linker Tag in GTM: This ensures ad click data is stored in first-party cookies for accurate attribution.
- Create Triggers for Form Submissions: Use Page View triggers for thank-you pages or Form Submission triggers for inline forms.
- Set Up Google Ads Conversion Tags in GTM: Input your Conversion ID and Label, and link them to the correct triggers.
- Test and Debug: Use GTM’s Preview mode and Google Ads diagnostics to confirm everything works.
Tracking lead forms with GTM not only improves conversion data accuracy but also speeds up campaign optimization in Google Ads. This guide walks you through the setup process step by step.
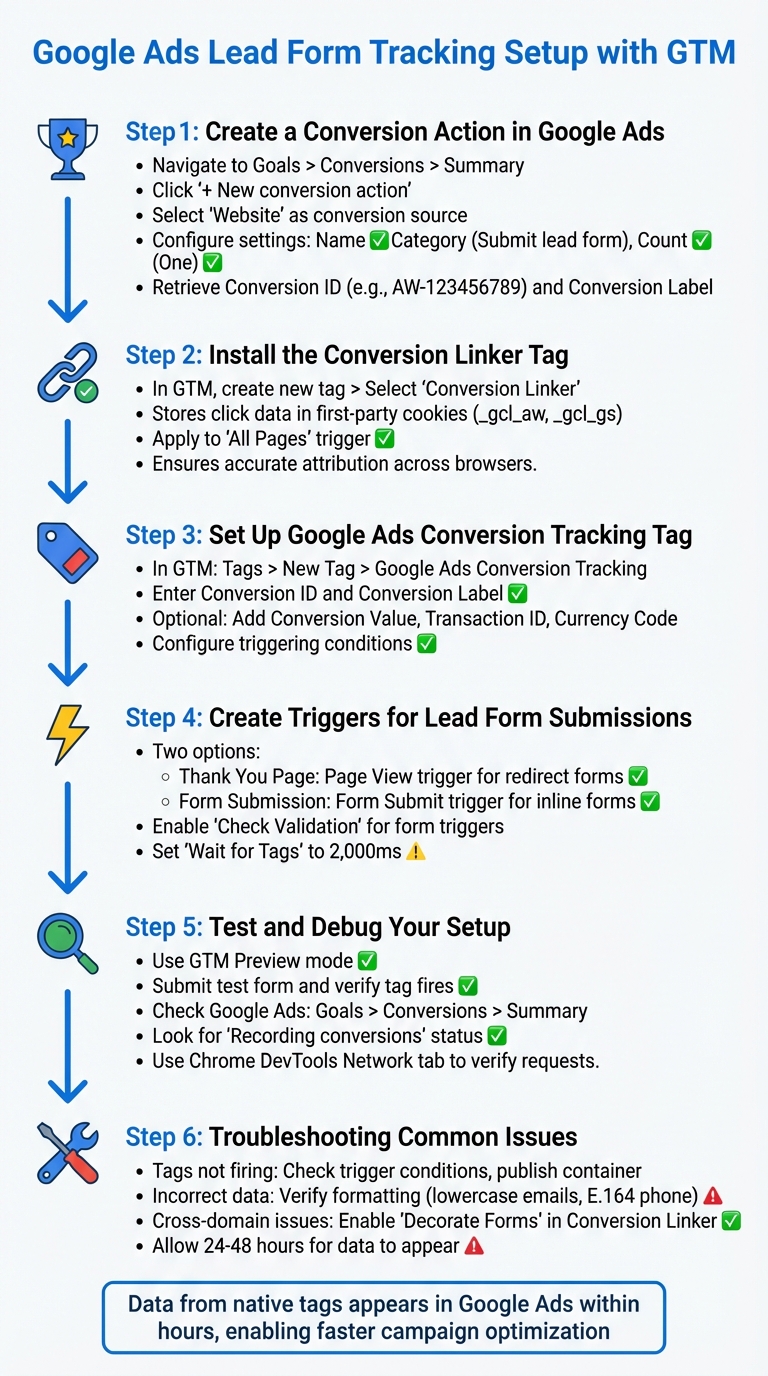
6-Step Guide to Setting Up Google Ads Lead Form Tracking with GTM
YouTube Video: Google Ads Lead Form Tracking With Google Tag Manager
sbb-itb-d8a1e45
Watch the YouTube video here: https://www.youtube.com/watch?v=puETYoND540
What You Need Before Starting
Before diving into lead form tracking setup, make sure you have all the necessary access and information. Missing any of these can delay the process.
Google Ads Account Access
To set up lead form tracking, you’ll need admin-level permissions in your Google Ads account. This access is essential for creating conversion actions, enabling auto-tagging, and agreeing to the required customer data terms.
Make sure auto-tagging is enabled so Google Ads can attribute conversions properly. If your account operates under a manager account (MCC) with cross-account tracking, the "Customer data terms" must be accepted at the MCC level. If you don’t see the "View Terms" option in your account, reach out to the MCC administrator to handle it.
For enhanced conversions, accept the "Policies and Additional Terms for Customer Data" within the Google Ads Goals menu. This step allows first-party data, such as email addresses or phone numbers, to be shared with Google for improved match rates.
Once your Google Ads account is set up, check your Google Tag Manager (GTM) container.
Google Tag Manager Account

Access to the website’s Google Tag Manager container is required. You’ll need "Publish" or "Admin" permissions to create and deploy tags, triggers, and variables.
Before creating new tags, confirm if a Conversion Linker tag is already active in the container. This tag is essential for storing ad click data in first-party cookies and ensuring accurate tracking. If it’s missing, you’ll need to add it during the setup process.
Lead Form Submission Confirmation
After verifying access to both platforms, determine how your site registers lead submissions. This step depends on whether the form redirects users to a new page or displays a success message on the same page.
-
For forms that redirect to a new page, identify the exact URL (e.g.,
example.com/thank-you). This URL must be unique and inaccessible without submitting the form to avoid tracking false conversions. Use a Page View trigger in GTM for this setup. - For forms with in-page success messages, locate the form’s HTML ID or the CSS selector for the success element. This setup requires a Form Submission or Custom Event trigger in GTM.
Additionally, take note of the first-party data fields your form collects, such as email, phone number, name, or address. Email is the preferred identifier as it’s more reliable and less prone to formatting errors. If phone numbers are collected, ensure they include a country code for accurate tracking. Use the HTML id attributes for these fields, as they’re more stable than class names and less likely to change during website updates.
Accurate lead submission tracking ensures your Google Ads campaigns receive reliable conversion data.
| Confirmation Method | Required Detail | GTM Trigger |
|---|---|---|
| Redirect to New Page | Unique URL path (e.g., /contact-success) |
Page View (Window Loaded) |
| In-Page Message (AJAX) | Form ID or Success Element ID | Form Submission or Element Visibility |
| Third-Party Embed | Data Layer Event or Iframe URL | Custom Event |
Step 1: Create a Conversion Action in Google Ads
Once you've set up access and confirmed your form, the next step is to ensure you're tracking key customer interactions effectively. This is where creating a conversion action in Google Ads comes into play. According to Google Ads Help, "When a customer completes an action that you've defined as valuable, these customer actions are called conversions".
Go to the Conversions Section
Start by signing in to your Google Ads account. In the navigation panel, click on the Goals icon (it looks like a trophy). From there, go to the Conversions drop-down menu and select Summary. Then, click the + New conversion action button.
When asked to choose a conversion source, select Website since you're tracking lead forms on your site. Enter your website's domain and hit Scan to verify whether the Google tag is installed or linked through Analytics. If you're using Google Tag Manager, opt to add a conversion action manually using code.
Once you've confirmed the setup, it's time to configure your conversion settings.
Set Up Your Conversion Settings
Give your conversion action a clear name, such as "Contact Us Form." Under the category options, choose Submit lead form or Qualified lead - this helps Google's algorithms optimize your ad bidding strategy.
Set the Count option to One to avoid tracking duplicate form submissions from the same user.
If possible, assign a monetary value to the conversion. Even an estimate, like $50, can help you measure your return on ad spend (ROAS). For the attribution model, select Data-driven to let Google's system analyze how each ad interaction contributes to the conversion. Finally, set the click-through conversion window to 30–90 days, depending on your sales cycle length.
With these settings finalized, you'll now need to retrieve your conversion tracking tag details.
Get the Conversion Tracking Tag
After saving your conversion action, head to the Tag setup tab. Select Use Google Tag Manager to generate your Conversion ID (specific to your entire Google Ads account) and Conversion Label (unique to this particular conversion action).
Copy both the Conversion ID (e.g., "AW-123456789") and Conversion Label. You'll need these details when setting up tracking in Google Tag Manager (GTM).
Step 2: Install the Conversion Linker Tag
Set up the Conversion Linker tag in Google Tag Manager (GTM) to connect ad clicks with lead forms by saving click data in first-party cookies.
What the Conversion Linker Tag Does
When someone clicks on your ad, the landing page URL typically includes click data, such as the GCLID parameter. The Conversion Linker tag detects this data and stores it in first-party cookies - _gcl_aw for Google Ads clicks and _gcl_gs for Google search clicks. Additionally, it saves the data in browser local storage under _gcl_ls.
This setup is critical because many modern browsers limit the use of third-party cookies. By using first-party cookies tied to your domain, the tag ensures that click data persists even if users navigate multiple pages before completing your lead form. When a conversion happens, your Google Ads conversion tags access these cookies to attribute the conversion back to the original ad click.
Important: If your GTM container already loads a Google tag on every page, you don’t need a separate Conversion Linker tag. The Google tag already performs this function.
Add the Conversion Linker Tag
To add the tag, open your Google Tag Manager container and follow these steps:
- Navigate to Tags in the left sidebar and click New.
- Select Tag Configuration and choose Conversion Linker from the featured tag types.
If your lead generation process involves multiple domains (e.g., a landing page on example.com and a thank-you page on checkout.com), enable cross-domain tracking. Enter all relevant domains in the Auto Link Domains field. For forms that submit across domains, set Decorate Forms to true to ensure tracking parameters are carried over.
Apply the Tag to All Pages
Under Triggering, choose the built-in All Pages trigger. According to Google Help, "In most cases, you should use the All pages trigger to ensure that the linker tag is active on any potential landing page". This ensures the tag captures click data no matter which page a visitor lands on.
Finally, name your tag something descriptive, like "Google Ads Conversion Linker", and click Save. Use GTM's Preview mode to confirm the tag fires correctly across your site. Once you’re satisfied, publish the container. This step ensures accurate click data tracking, which is crucial for precise conversion attribution.
With this tag in place, you’re ready to move on to setting up your Google Ads conversion tracking tag in GTM.
Step 3: Set Up the Google Ads Conversion Tracking Tag
Once you've created the conversion action and installed the Conversion Linker tag, the next step is setting up the Google Ads conversion tracking tag in Google Tag Manager (GTM). This tag will track lead form submissions and send the data back to your Google Ads account.
Create a New Tag in Google Tag Manager
Start by opening your GTM workspace. In the left sidebar, click on Tags, then select New Tag. From here, choose Tag Configuration and select Google Ads from the available tag types. Next, pick Google Ads Conversion Tracking - this tag is specifically designed to send conversion data to your Google Ads account whenever it’s triggered.
Enter Your Conversion Details
You'll need to input the Conversion ID and Conversion Label that you retrieved earlier. These details are crucial for tracking:
| Field | Requirement | Description |
|---|---|---|
| Conversion ID | Required | A unique identifier for your Google Ads account. |
| Conversion Label | Required | A unique label tied to the specific conversion action you're monitoring. |
| Conversion Value | Optional | The monetary value assigned to each lead (defaults to 0 if left blank). |
| Transaction ID | Optional | A unique identifier to avoid counting duplicate conversions. |
| Currency Code | Optional | The 3-letter ISO code for your currency (e.g., USD). |
If you want to assign a dollar value to each lead, enter it in the Conversion Value field. For dynamic values, you can use a GTM variable to pull data from your data layer. Similarly, for the Transaction ID, consider using a variable to ensure duplicate conversions aren’t recorded (e.g., if someone refreshes the thank-you page).
Configure When the Tag Fires
Now, move on to the Triggering section to define when this tag should activate. For a typical setup:
- Use a Page View trigger for thank-you pages if your form redirects users after submission.
- For non-redirect forms, set up a Form Submission trigger instead.
Once everything is configured, name your tag - something like "Google Ads Lead Form Conversion" works well - and save it. The next step involves setting up the necessary triggers to make this tag functional.
Step 4: Create Triggers for Lead Form Submissions
Once your conversion tag is ready, the next step is to set up triggers in Google Tag Manager (GTM) to detect lead form submissions. Triggers ensure your tag fires at the right time. Depending on how your form behaves, you can use either a Thank You Page trigger for redirects or a Form Submission trigger for inline forms.
Create a Thank You Page Trigger
If your lead form redirects users to a confirmation page (e.g., /thank-you/), this is a reliable way to track submissions. In GTM, head to Triggers in the left menu and click New. Select Page View as the trigger type. Instead of "All Pages", choose Some Page Views, and set a condition where Page Path contains your thank-you page URL, such as /thank-you/ or /form-confirmation/. Give the trigger a clear name like "Thank You Page - Lead Form" and save it. This trigger will fire whenever someone lands on that specific URL after submitting the form.
One crucial tip: avoid linking your thank-you page in your navigation or sitemap. Vikash Koushik, Head of Content & Community at AdConversion, emphasizes this point:
"The one mistake I see folks repeat often is they link to this thank you or add it in your sitemap... you want to double check to ensure that people don't land on this page through other sources."
If the page is accessible from other sources, you risk tracking false conversions from users who visit the URL without submitting the form.
For forms that don’t redirect to a new page, use the form submission trigger method instead.
Create a Form Submission Trigger
If your form stays on the same page after submission - like pop-ups or inline forms - you’ll need a Form Submission trigger. First, enable GTM to capture form details. Go to Variables, click Configure, and check all boxes under the Forms section. This allows GTM to track elements like Form ID and Form Classes.
Next, create a new trigger and choose Form Submission as the type. Enable Check Validation to ensure the trigger fires only when the form is successfully submitted. Also, set Wait for Tags to 2,000 milliseconds to give tags time to fire.
"The 'Check Validation' option set the trigger to fire only if the form is successfully sent. If unselected, the trigger will fire whenever a user attempts to submit the form." - Google Tag Manager Help
Instead of selecting All Forms, choose Some Forms and add a filter. Use GTM’s Preview mode to test-submit the form and identify the Form ID or Form Classes in the Variables tab. Then, set a condition like Form ID equals contact-form to ensure the trigger fires only for the correct form. This prevents it from activating on unrelated forms elsewhere on your site.
Test Your Triggers
Once your triggers are set up, it’s time to test them. Open GTM’s Preview mode and submit your form. Look for a Form Submit event in the Tag Assistant timeline (or a Page View event if you’re using a thank-you page trigger). Check if your Google Ads Conversion tag appears under Tags Fired. If it’s listed under Tags Not Fired, review your trigger filters to identify any unmet conditions.
Test your setup further by submitting both valid and invalid forms. Julius Fedorovicius, Founder of Analytics Mania, explains why this step is important:
"If Form Submit event did not fire [during an error imitation] – that's great! It means that GTM will track only those form submissions which were successfully completed (and this is exactly what you need)."
This ensures your triggers only track genuine lead submissions, avoiding inflated conversion data from failed attempts.
Step 5: Test and Debug Your Setup
Now that your triggers are in place, it’s time to test and debug your setup to ensure that conversion data flows smoothly. This step ensures that every part of your configuration - from the conversion tag to the triggers - works as expected. Start by clicking the Preview button in the top-right corner of Google Tag Manager. This opens the Tag Assistant, where you can enter your website URL and launch a debugging session.
Use Preview Mode in Google Tag Manager
Once in the Tag Assistant, you’ll notice an Event Timeline on the left and several tabs on the right, such as Tags, Variables, Data Layer, Consent, and Errors. Navigate to your lead form in the previewed window, fill it out, and submit it. Check if a Form Submit or the designated custom event appears in the timeline.
Click on the form submission event and confirm that the Google Ads Conversion Tracking tag is listed under "Tags Fired." If it’s under "Tags Not Fired", click the tag to pinpoint unmet conditions, marked by a red X. Analytics expert Julius Fedorovicius offers this advice:
"Don't check the summary for the debugging of an individual tag. That's not a good idea. Always choose an event in the left side of the preview and debug console and then check what happened with your tag."
Explore the Variables and Data Layer tabs to verify that the form identifiers and data align with your conditions. Once you confirm that the tag fires correctly in GTM, move on to Google Ads to ensure the conversion data is being recorded.
Check Conversion Data in Google Ads
To verify that your conversion data is showing up in Google Ads, go to Goals > Conversions > Summary in your account. Look at the Status column - if it says "Recording conversions", your tag is active. For enhanced conversions, check the Diagnostics report to evaluate data quality, which may be labeled as "Excellent", "Good", "Needs attention", or "Urgent."
For further validation, open Chrome Developer Tools and view the Network tab. Submit your form and look for requests to https://google.com/pagead/form-data/. The em parameter should display a hashed string, confirming that user data is being sent properly. If this request is missing, your conversion tag might not be firing, or the enhanced conversion setup may need adjustments.
Fix Common Problems
If your tag isn’t firing, the most frequent culprits are incorrect trigger conditions or the tag not being published in GTM. Use Preview mode to identify where the issue lies. For AJAX-based forms that don’t trigger native submit events, consider using a Thank You page trigger or creating a Custom Event trigger.
If user-provided data isn’t being captured, double-check your selectors and variable configurations. Google Help suggests prioritizing ID attributes over CSS classes:
"IDs are unique and less likely to change over time than other properties, such as class names or names. They also aren't affected by layout changes."
Make sure email addresses are converted to lowercase and phone numbers are formatted in E.164. Additionally, ad blockers or cookie consent banners can interfere with tag firing, so it’s wise to test in an incognito window or with blockers turned off.
Step 6: Troubleshooting Common Issues
Even with a proper setup, problems can still crop up. This section dives into typical issues and how to fix them. A common headache is tags not firing, often due to mismatched trigger conditions and website events. For instance, a typo in your "Thank You" page URL or an incorrect custom event name in the dataLayer can stop the trigger from working. Another common oversight? Forgetting to publish your GTM container - make sure to hit both "Submit" and "Publish" in Google Tag Manager so your changes go live.
Tags Not Firing
When a conversion tag doesn't fire, check if a Conversion Linker tag is active across all pages. Without it, the gclid won't be stored, which impacts attribution. Consent Mode can also block tags if users haven't granted permission for ad_storage or ad_user_data. Additionally, ad blockers or privacy extensions might prevent tracking scripts from loading properly, so test your setup in an incognito window with blockers disabled.
Timing can also play a role. If a redirect happens too quickly, the conversion tag may not have enough time to send data. To address this, enable the "Wait for Tags" option in your GTM trigger settings. Use Chrome Developer Tools' Network tab to check for requests to "google.com/pagead/1p-conversion/". In GTM's Preview mode, if the tag shows up under "Tags Not Fired", click on it to see if a condition like Page URL or Event Name isn't matching.
From there, ensure your data formatting is correct to avoid further issues.
Incorrect Conversion Data
Incorrect data often stems from formatting errors. Before hashing user information with SHA-256, clean it up: remove extra spaces, convert text to lowercase, and format phone numbers to the E.164 standard (e.g., +11234567890). For Gmail addresses, strip out periods (.) and any plus (+) suffixes in the username to improve match rates. Check the Enhanced Conversions for Leads diagnostics report under Goals > Summary for errors like missing PII or formatting issues.
If you're dealing with duplicate conversions, include a unique Transaction ID or Order ID in each conversion tag. Google Ads will ignore duplicate conversions with the same ID. Note that it may take up to 48 hours for conversion status to reflect updates, and new conversion actions may remain "Inactive" until triggered by an actual ad click, which could take up to 24 hours.
Fixing these formatting problems can also help streamline cross-domain tracking.
Cross-Domain Tracking Issues
Cross-domain tracking can fail if the _gl parameter doesn’t appear in the URL when users move from your main site to a form domain. Additionally, the _gcl_aw cookie value needs to match exactly across both domains for proper attribution. If you're using lead forms on different domains, enable "Decorate Forms" in your Conversion Linker tag settings. Keep in mind that server-side or JavaScript redirects can strip URL parameters like the GCLID. Work with your developers to ensure these parameters stay intact.
Use Tag Assistant (tagassistant.google.com) to diagnose issues. If you see messages like "Additional domains detected for configuration", it means some domains receiving traffic aren't included in your cross-domain settings. Addressing these gaps ensures smoother tracking and attribution across domains.
Conclusion and Next Steps
Setting up lead form tracking with Google Tag Manager gives you a clear view of which ads and keywords are driving conversions. Using native Google Ads conversion tags ensures you receive conversion data quickly, allowing for faster automated bidding and campaign adjustments.
Key Takeaways
Getting tracking right starts with deploying the Conversion Linker tag on every page and enabling enhanced conversions. Enhanced conversions use hashed first-party data to connect website leads with Google accounts. Assigning monetary values to leads is another critical step; it helps you measure ROAS directly in your Google Ads reports. Julius Fedorovicius, Founder of Analytics Mania, highlights the advantage of native tags:
Data from the native tag is sent directly to Google Ads, often appearing within hours. This allows Google's ad algorithms to optimize your campaigns more quickly based on the most current conversion data.
This setup lays the groundwork for you to effectively analyze and act on your lead data.
Use Lead Data to Improve Your Campaigns
Once tracking is active, dive into the data to fine-tune your campaigns. Segmenting conversion actions helps you evaluate lead quality, enabling Smart Bidding to focus on high-intent users. With GTM, you can also track custom parameters like Form ID and Page URL to identify which landing pages perform best. Vikash Koushik, Head of Content & Community at AdConversion, explains:
By tracking and feeding all these data points back into ad networks, you help the algorithm prioritize high-intent users.
Integrating your CRM into the process allows you to follow the buyer's journey from the initial form submission to closed deals. This provides a full picture of which campaigns are driving actual revenue.
Learn More with Surfside PPC

If you're looking to build on these strategies, Surfside PPC offers resources to take your skills to the next level. They provide free Google Ads courses, GTM masterclasses, and hands-on consultation sessions to help you improve your tracking and campaign optimization. Their monthly management services include everything from conversion tracking setup to landing page optimization and ongoing campaign refinement, complete with dedicated support. Dive deeper into their offerings to elevate your tracking and campaign results.
FAQs
Do I need a Conversion Linker tag if I already use the Google tag?
If you’re using the Google tag, you might not need a separate Conversion Linker tag. However, adding one is a smart move to improve the accuracy of your conversion tracking. This is especially important for tasks like attribution and cross-domain tracking. While a well-configured Google tag can often handle conversions on its own, the Conversion Linker tag acts as an extra layer of security to help prevent tracking hiccups.
What’s the best way to track AJAX forms that don’t redirect?
The most effective way to track AJAX forms without relying on redirects is by setting up custom event tracking in Google Tag Manager (GTM). Start by identifying the AJAX request using your browser’s developer tools. Once located, you can create a trigger in GTM to monitor that specific request or its response. Another option is to push the form submission data into the data layer and use a custom data layer event to fire the appropriate tags.
How can I prevent duplicate conversions from refreshes or repeats?
To prevent duplicate conversions caused by page refreshes or repeated form submissions, you can leverage cookies or local storage in Google Tag Manager (GTM). Here's how:
- Set a cookie or a local storage item when a lead is submitted.
- Adjust your GTM trigger to activate only if this cookie or storage item isn’t already present.
Additionally, you can use custom variables or JavaScript within GTM to ensure that each lead is tracked only once. This approach helps maintain accurate conversion data and avoids inflated metrics.
Related Blog Posts
- How To Use Google Ads Data For Inbound Marketing
- Google Ads tutorial
- Google Ads Phone Call Tracking With Google Tag Manager
- Google Ads For Beginners
0 comments