
Google Ads Editor is a free desktop tool that makes managing your campaigns offline simple and efficient. It’s ideal for bulk edits, multi-account management, and offline functionality. You can download data, make changes offline, and upload edits when ready. Key features include:
- Bulk Editing: Update thousands of campaigns, keywords, or ads at once using spreadsheets.
- Offline Access: Work without internet and sync changes later.
- Error Validation: Identify and fix issues before publishing.
- Multi-Account Management: Ideal for agencies handling multiple clients.
- Advanced Tools: Features like search term reports, campaign-level negative keywords, and bid adjustments streamline workflows.
This tool is designed for advertisers managing large accounts, agencies, or those needing offline access. It saves time, reduces errors, and provides flexibility for managing campaigns at scale.
Key Takeaway: Google Ads Editor simplifies campaign management with bulk edits, offline functionality, and advanced features, making it a go-to for advertisers of all sizes.
Google Ads Editor Complete Tutorial (2025 Update)
sbb-itb-d8a1e45
Setting Up Google Ads Editor
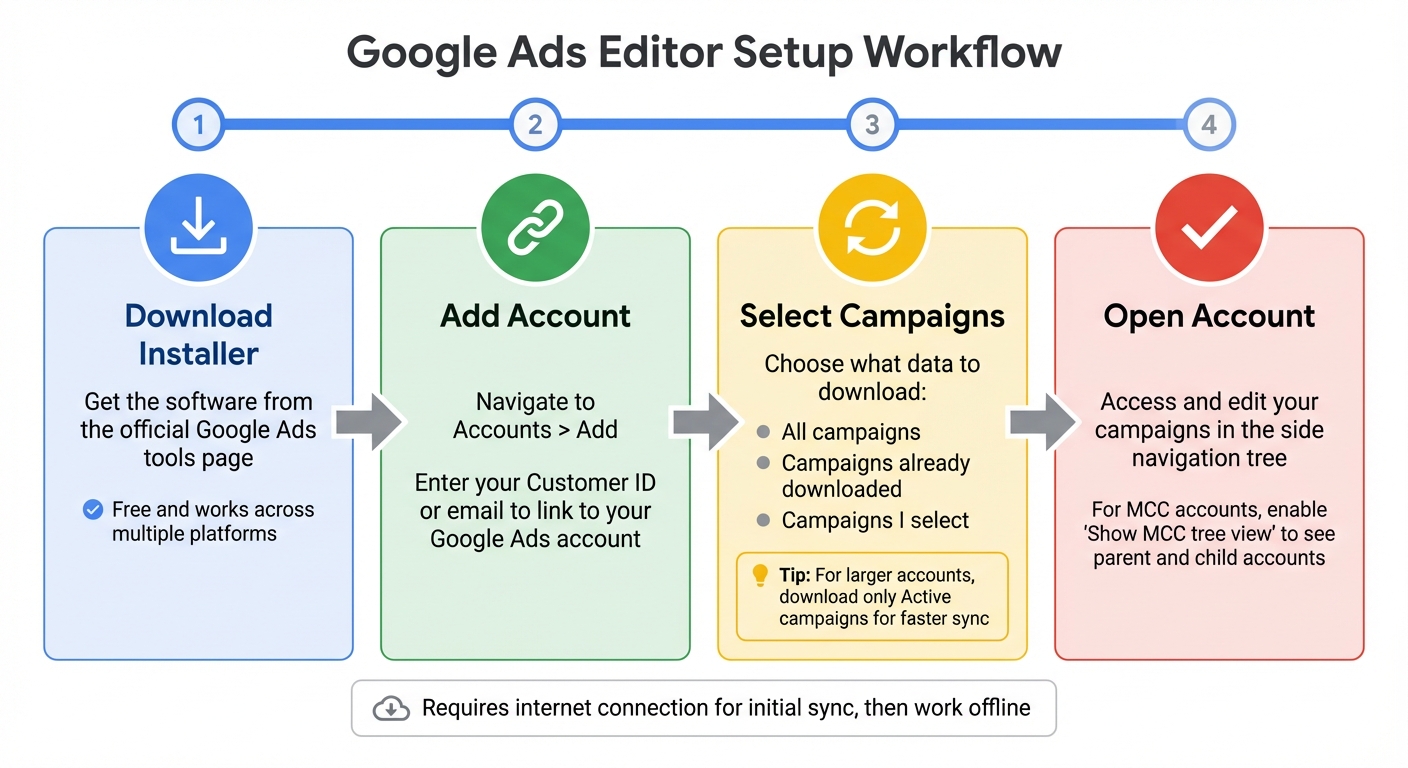
Google Ads Editor Setup Process: 4-Step Installation and Configuration Guide
Downloading and Installing
To get started, download the installer from the official Google Ads Editor page. Before diving in, double-check that your device meets the system requirements. The application is free and works across multiple platforms.
Once the installer is downloaded, run it and follow the on-screen instructions. The installation process is quick and straightforward. Afterward, you’ll be ready to configure your account settings.
Initial Configuration
When you launch Google Ads Editor for the first time, the first step is linking it to your Google Ads account. Navigate to Accounts > Add, then enter your email or customer ID. Follow the prompts to sign in and authorize the connection.
Next, decide what data you want to download. You’ll see three options: "All campaigns", "Campaigns already downloaded", or "Campaigns I select". For larger accounts, it’s best to download only Active campaigns during this step. This reduces the amount of data being processed, making the sync faster and ensuring smoother performance. Campaigns that are paused or ended will remain on the server, so you won’t lose access to them.
Once the progress bar completes, select your account and click Open to view your campaigns. If you’re managing a manager account (MCC), sign in using your manager credentials and enable the Show MCC tree view option. This will let you see the full hierarchy of parent and child accounts. Keep in mind that you’ll need an internet connection for this initial sync, but after the data is downloaded, you can make edits offline.
Here’s a quick summary of the setup process:
| Setup Phase | Key Action | Description |
|---|---|---|
| Installation | Download Installer | Get the software from the official Google Ads tools page. |
| Connection | Add Account | Enter your Customer ID or email to link to your Google Ads account. |
| Syncing | Select Campaigns | Choose specific campaigns or data types (e.g., keywords, ads) to download. |
| Finalization | Open Account | Access and edit your campaigns in the side navigation tree. |
Understanding the Google Ads Editor Interface
Interface Layout Overview
Once your account is set up, getting familiar with the Google Ads Editor interface is key to working efficiently. The layout is organized into five main sections that follow a hierarchical structure. At the very top is the Application Menu, where you'll find options like Account, Edit, Tools, Data, and Help. Directly below that is the Toolbar, which includes essential buttons for syncing, validating, and posting your changes.
On the left side, you'll see the Tree View, which lets you navigate through the account hierarchy, and the Type List, where you can choose specific data categories. When you select a category in the Type List, the Data View in the center updates to display all relevant items in a spreadsheet-like format.
The Data View acts as your primary workspace. Selecting a row here opens the Edit Panel, where you can make quick changes. You can resize this panel or even move it to a separate window - perfect if you're using multiple monitors.
If you want more space to focus on data, you can collapse the Tree View or Edit Panel. To keep track of your edits, pay attention to the color coding: green indicates new items, purple shows unposted edits, and deletions are marked with a strikethrough.
Next up, let’s dive into the toolbar and its shortcuts, which are designed to boost your productivity.
Toolbar Functions and Shortcuts
The toolbar is your main control hub for managing accounts. Key buttons include Get Recent Changes (Ctrl+T on Windows, Cmd+T on Mac), which syncs the latest data from your live account, Check Changes (Ctrl+K or Cmd+K) to validate edits, and Post (Ctrl+P or Cmd+P) to upload your changes to Google Ads.
Mastering keyboard shortcuts can save you a ton of time. For example, you can use Ctrl+1 through Ctrl+5 (Cmd+1 through Cmd+5 on Mac) to switch between the Campaigns tree, Type List, Data View, and Edit Panel without using your mouse. Another handy shortcut is Ctrl+Shift+B (Cmd+Shift+B on Mac), which opens the "Make multiple changes" tool - great for importing data from spreadsheets. Additionally, Alt+Left/Right arrow allows you to quickly toggle between the Tree View and Data View.
Here’s a quick-reference table for these shortcuts:
| Action | Windows Shortcut | Mac Shortcut |
|---|---|---|
| Get recent changes | Ctrl + T | Cmd + T |
| Check changes | Ctrl + K | Cmd + K |
| Post changes | Ctrl + P | Cmd + P |
| Jump to Data view | Ctrl + 4 | Cmd + 4 |
| Jump to Edit panel | Ctrl + 5 | Cmd + 5 |
| Make multiple changes | Ctrl + Shift + B | Cmd + Shift + B |
| Undo / Redo | Ctrl + Z / Ctrl + Shift + Z | Cmd + Z / Cmd + Shift + Z |
Always start by clicking Get Recent Changes when you open the app to ensure you're working with updated data. Before uploading your edits, use the Check Changes button to identify any issues. Red indicators highlight errors that must be fixed before posting, while yellow warnings are optional but worth reviewing.
Managing Campaigns and Making Bulk Edits
Selecting and Editing Multiple Items
Google Ads Editor simplifies managing large accounts by allowing you to edit multiple items at once. To select non-adjacent rows, use Control + click on Windows or Command + click on Mac. For a continuous range, click the first row, hold Shift, and then click the last row.
Ren Soto from Seer Interactive emphasizes syncing with the "Get Recent Changes" feature. This ensures you're working with the most up-to-date campaign data and helps avoid overwriting updates made directly through the online interface.
For large accounts, downloading only the "Campaigns I select" can save time. This option lets you focus on active campaigns or specific entities that need updates, streamlining the process.
Bulk Editing Features
The Make Multiple Changes tool is perfect for importing data from spreadsheets. You can copy lists directly from Google Sheets or Excel, and the Editor will automatically assign the data to the correct fields. When preparing your spreadsheet, use tabs or commas to separate fields and ensure all column headers are in English.
The Find and Replace tool is handy for updating specific text across multiple ads - ideal for replacing seasonal promo codes, calls-to-action, or URLs. To refine your edits, use hierarchical filters to narrow your view to specific items, like broad match keywords in active campaigns.
Here’s a quick breakdown of bulk editing features and their benefits:
| Feature | Best Use Case | Key Benefit |
|---|---|---|
| Make Multiple Changes | Uploading large lists of new keywords or ads | Saves time compared to manual input |
| Find and Replace | Updating promo codes or URLs across many ads | Ensures consistency and reduces errors |
| Copy & Paste | Duplicating successful ad group structures | Quickly scales proven campaign strategies |
| Bulk Bid Adjustments | Adjusting bids for high-performing keywords | Optimizes performance across campaigns |
When adjusting bids or updating match types in bulk, simply select the keywords you want to modify, click Edit, and apply the changes. The Editor’s undo and redo options make it easy to test changes confidently without fear of losing progress.
Once bulk edits are complete, you can further refine your campaigns by duplicating them or managing negative keywords.
Campaign Duplication and Negative Keywords
Refining campaign structures can boost performance. When duplicating campaigns, you can choose Copy (includes all ads, keywords, and settings) or Copy shell (settings only). The shell option is helpful if you want to replicate a campaign's structure but start fresh with new content.
After duplicating, rename campaigns immediately in the edit panel to avoid confusion. If you’re not ready to launch a new campaign, Silvio Perez from AdConversion suggests, "Change the status to Paused to prevent it from spending when published."
For managing negative keywords, go to Keywords and targeting in the type list, then select Keywords, Negatives. Use the Paste Special feature to add negative keywords to multiple campaigns or ad groups at once, rather than doing it manually. To avoid internal competition, the Find duplicate keywords tool under the Tools menu helps identify and remove redundant keywords.
Finally, always run Check Changes before posting. Red icons indicate critical issues that must be resolved, while yellow warnings highlight areas worth reviewing. This step ensures your updates are error-free and ready to go live.
Using Advanced Features for Optimization
Using Advanced Search and Filters
The advanced search feature in Google Ads Editor is a powerful way to filter accounts using specific criteria, such as campaign type, bid strategy, ad group status, or item state. By layering multiple filters, you can pinpoint highly specific data. For instance, you could locate Search campaigns using a Manual CPC bid strategy.
To refine your searches, wrap search terms in quotation marks for exact matches. You can also filter numerical ranges, like finding campaigns with a CPA bid within a specific dollar range. The COUNT function is particularly helpful for identifying underperforming ad groups, such as those with fewer than five approved keywords.
Other filter functions include EXIST, NOT, and CONTAINER, which allow you to search based on "contained items." For example, you can find ad groups missing responsive search ads or identify expanded text ads missing essential brand terms in their headlines. Additionally, Custom Views make it easy to isolate items with unposted changes, errors, warnings, or imported file changes.
To save time, you can store frequently used search queries and assign them keyboard shortcuts for quick access. Another handy tool is "Show ads with selected images", located in the Tools menu, which lets you find and update all ads using a specific visual asset across your account.
| Function | Optimization Use Case |
|---|---|
| COUNT | Identify campaigns or ad groups with too few (or too many) keywords or ads |
| EXIST / NOT | Locate ad groups missing elements like responsive search ads |
| CONTAINER | Filter based on the status or settings of parent campaigns or ad groups |
| AND / OR / NOT | Combine multiple conditions for precise segments in bulk editing |
Once you've set up these refined data views, you can move on to optimizing bids and rules.
Bid Adjustments and Rules
Bid adjustments in Google Ads are multiplicative, not additive. For example, applying three separate +30% adjustments results in a combined increase of over 119% - a key detail to keep in mind when managing profitability.
If you're using Smart Bidding strategies like Target CPA or Target ROAS, manual bid adjustments for locations, ad schedules, and demographics are usually ignored since the AI handles these signals automatically. However, audience bid adjustments remain effective and can complement these strategies.
"Audience Bid Adjustments work with Target CPA & Target ROAS bidding... it's a very valuable one [adjustment]... it works amazingly well." - Brad Geddes, Co-Founder, Adalysis
The Advanced bid changes tool in Editor simplifies bulk bid updates across ad groups. When switching bidding strategies, avoid altering irrelevant bid types (e.g., CPM bids in a CPC group) to prevent validation errors. Combined bid adjustments are capped at a 900% maximum increase, with a minimum adjustment of -90%.
Research indicates that learning algorithms for automated bidding may require up to 200 conversions to achieve 91% of optimal performance, even though Google recommends a minimum of 50 conversions within 30 days. If you need to completely exclude a device from your campaign, a -100% bid adjustment will do the trick.
With bids optimized, let’s explore the latest tools available for campaign refinement.
New Features Overview
In November 2025, Google Ads Editor version 2.11 introduced several updates. Performance Max campaigns now allow campaign-level negative keyword management, helping to reduce wasted spend on irrelevant searches. Additionally, the new search term reporting for PMax provides insights into which queries trigger ads, enabling better targeting.
A feature called Smart Bidding Exploration lets Search campaigns test high-performing queries with flexible ROAS targets, aiming to drive incremental conversions. Meanwhile, Scheduled link checks automatically scan for broken URLs, ensuring smooth user experiences and reducing manual audits.
Other notable updates include account-level exclusions for placements and IP addresses, which streamline setup and enhance brand safety. The automated video generation tool creates on-brand video creatives using existing assets, making YouTube advertising more accessible. Plus, editable lead forms can now be adjusted directly in the Editor without starting from scratch.
"This update enhances ad placement control, Performance Max transparency, and introduces automation tools that boost efficiency - all leading to smarter spending and stronger ROI." - Anu Adegbola, Paid Media Editor, Search Engine Land
Another improvement is the selective campaign syncing interface, which allows you to download only specific campaigns or item types. This saves time, especially when managing large accounts. To maximize ROI, regularly review PMax search term reports and promptly add irrelevant queries to your campaign-level negative keyword lists.
Previewing, Validating, and Publishing Changes
Previewing and Validating Edits
Once you've made bulk edits using Google Ads Editor, it's time to ensure everything is ready to go live. Start by selecting your account name, opening the filters, and choosing "All unposted changes." This view isolates your recent edits, making it easier to review them in one place.
The "Check changes" tool is your go-to for validation. It checks your edits against Google Ads policies and technical requirements, flagging potential issues before they cause disruptions. You can validate changes for a single account or multiple accounts simultaneously through the Account Manager. If any problems are detected, error icons will appear next to the affected items and their corresponding tabs.
Google Ads Editor uses a color-coded system to help you understand the status of your edits:
- Red icons signal critical errors that prevent posting. These must be addressed before proceeding, and the Editor provides specific instructions to help resolve them.
- Yellow icons indicate warnings. While they won't block your updates, it's a good idea to review these items to ensure everything is in order.
- Green icons confirm that your edits have passed all checks and are ready for posting.
| Icon Color | Meaning | Impact on Posting |
|---|---|---|
| Red | Error | Blocks posting; must be fixed or exception requested |
| Yellow | Warning | Does not block posting; recommended for review |
| Green | Passed | Confirms the item passed policy checks |
This color-coded system simplifies the validation process, helping you quickly identify and resolve issues. Once all edits are validated and marked with green icons, you're ready to update your live account.
Posting Updates to Google Ads
To publish your changes, click the Post button in the toolbar. You'll have the option to post either "All campaigns" or "Selected campaigns." Review the summary of changes carefully, then click Post to begin uploading.
As the updates sync, you'll see a real-time progress report. If needed, you can pause and resume the process without losing your work. Plus, Google Ads Editor allows you to continue working on other accounts while updates are being posted for a different one. Once the posting is complete, your changes will reflect in your Google Ads account. Keep in mind, there might be a slight delay before the updates are fully live across the Google Network.
After posting, check your campaign list for bolded items - these indicate changes that failed to upload and need troubleshooting. If you require a permanent record of the process, copy the detailed post-report into a separate document for auditing purposes.
To avoid conflicts, always download the latest changes from your online account before starting a new editing session. This ensures you're working with the most current data and keeps everything in sync between your offline and online accounts.
Troubleshooting Common Errors
When you’ve validated and posted changes, addressing technical issues that pop up during editing or uploading is a must. Here's how to tackle some of the most frequent problems.
Resolving Syncing Errors
Network issues can occasionally disrupt Google Ads Editor, leading to errors like 502 or DEADLINE_EXCEEDED. These are temporary glitches between your computer and Google’s servers. The easiest solution? Wait a few minutes and try again.
If you see Error 407, it’s a proxy authentication issue. Fix it by updating your HTTP proxy settings: go to Tools > Settings on Windows or Google Ads Editor > Preferences on Mac. Encountering sign-in problems after enabling 2-step verification? You’ll need to create an application-specific password instead of using your usual login.
For messages like "Get recent changes recommended" or "Google Ads Editor tried to modify an item which no longer exists," your local data is out of sync. Perform a Full download from the Account menu to refresh everything. If large accounts time out during downloads, Windows users can run start google_ads_editor.exe -dlMaxRequests in the command prompt. On Mac, use open -a 'Google Ads Editor' --args -dlthreads 1 in Terminal.
| Error Code / Message | Meaning | Recommended Resolution |
|---|---|---|
| 502 / DEADLINE_EXCEEDED | Temporary network issue | Retry the operation later |
| 407 | Proxy authentication error | Update proxy settings in Tools > Settings (Windows) or Preferences (Mac) |
| EntityCountLimitExceeded | Account limits reached | Check item counts in tabs and review diagnostic logs to pinpoint the issue |
| Get recent changes recommended | Outdated local version | Perform Get recent changes before posting again |
| 129 | Terms & Conditions not accepted | Log in to the Google Ads account online and accept the latest Terms & Conditions |
Fixing Validation Errors
Validation errors can block updates, but they’re easy to locate. Click the search menu icon, then go to View filters > Items with errors or warnings. This will display all problematic entries. Select a row with a red icon, and detailed instructions will appear in the red box below the edit panel.
If a policy violation is flagged incorrectly, select the item and click Request exemption before reposting. For errors like "Post will cause you to exceed account limits," enable diagnostic logging in Settings, repost, and review the log file for EntityCountLimitExceeded to find the problematic campaign or ad group.
Messages such as "Fatal error" or "Unexpected response" often mean you’re trying to upload features that Google Ads no longer supports - like deprecated message assets. Remove these unsupported items and try again.
Addressing Performance and Speed Issues
Slow performance can occur when you download too much data at once. Instead of pulling everything, use the "Campaigns I select" option to download only active campaigns. You can also speed things up by excluding removed items, images, and videos in your download settings.
If the interface lags, collapse the account tree and edit panels to declutter your screen. Also, ensure your screen resolution is above 1,024x768 pixels. Persistent slowdowns? Enable diagnostic logging under Tools > Settings (Windows) or Google Ads Editor > Preferences (Mac). This will generate logs to help pinpoint the problem.
For further troubleshooting, try downloading on a different network or computer. If you’re using security software like Microsoft Security Essentials, exclude the Google Ads Editor log directory and google_ads_editor.exe from real-time scanning to avoid interference.
Conclusion
Key Benefits Recap
Google Ads Editor simplifies PPC management by offering offline access and powerful bulk editing tools. With offline functionality, you can tweak campaigns, adjust bids, and refine targeting without needing an internet connection. Its ability to handle large-scale changes across thousands of campaigns, ad groups, and keywords saves a tremendous amount of time compared to making edits manually online.
The draft-and-review system ensures that all changes stay local until you're ready to post them, giving you the opportunity to double-check, undo, or fix mistakes before they go live. This feature is especially critical when you consider that companies waste an average of 40% of their media budgets, making precision and accuracy in campaign management essential. Bulk management tools and advanced search-and-replace functions further streamline your workflow, helping you focus on driving better results.
"Using Editor reduces the chance for error." – Melissa Mackey, Head of Paid Search at Compound Growth Marketing
Final Thoughts
This guide has walked you through how to make the most of Google Ads Editor, highlighting its practical features and strategies. With Google Ads delivering an average return of $8 for every $1 spent, optimizing campaigns efficiently is more important than ever. Whether you're managing a handful of campaigns or scaling up to the platform's 10,000-campaign limit, Google Ads Editor equips you with tools to work smarter. Features like advanced bid adjustments and campaign duplication further enhance your ability to maximize ROI.
Don’t forget to regularly sync with "Get recent changes", use filters to zero in on key data, and validate edits before posting. Best of all, the tool is free - download it and explore its capabilities today. Start small with a few bulk edits, then gradually dive into its advanced features. The time and effort you save will make a noticeable difference in your campaign management.
FAQs
How do I avoid overwriting changes made in Google Ads while using Editor?
To avoid accidental overwrites in Google Ads, it's crucial to handle proposed edits with care. Take the time to review and decide whether to accept or reject individual changes before posting. If you're working with bulk edits, use the Undo feature (when available) to reverse specific changes quickly.
For added safety, consider exporting backups of your account or campaigns before making adjustments. This way, you can restore your previous data if something goes wrong. Lastly, always double-check for any conflicting edits before applying changes to ensure nothing gets overwritten unintentionally.
What’s the safest way to bulk import ads or keywords from a spreadsheet?
The best way to bulk import ads or keywords into Google Ads Editor is by using the "Make multiple changes" tool or uploading a correctly formatted CSV file. Make sure your spreadsheet includes all the necessary columns - such as campaign name, ad group, and keywords - with headers written in English. Before uploading, double-check for any formatting issues to reduce errors and ensure your data stays accurate.
Why won’t my bid adjustments apply when using Smart Bidding?
Smart Bidding usually ignores bid adjustments because it operates as an automated strategy powered by machine learning. Since it dynamically adjusts bids to align with your campaign objectives, manual adjustments could interfere with these automated optimizations.
0 comments