Google Display Ads: Complete Guide For 2023
Welcome to the Google Display Ads guide by Surfside PPC. We have plenty of different video and article lessons below, and everything is completely free. We cover everything you need to know about Google Display Ads campaigns, the Google Display Network (GDN), and more. Regardless of your business type, there are plenty of strategies you can follow with your Google Display Advertising campaigns.
Browse Our Google Display Advertising Guide:
Google Display Ads Video Tutorial
Google Display Ads Video Playlist
How to Create a Google Display Ads Campaign
Google Display Ads Strategy
Google Display Ads Targeting
Google Responsive Display Ads
Google Display Ads Remarketing
Optimize Google Display Advertising Campaigns
Google Discovery Ads
We will continue to add new content here, so check back over time as the guide improves. You can find our Google Display Advertising tutorials below, or go to our YouTube Playlist for Google Display Ads. If you scroll down, you can find individual articles for the tutorials as well. You should have all the resources and information you need to get started with Display Network Ads campaigns.
Google Display Ads Video Tutorial
Join Surfside VIP today for only $2.99/month! Learn how to create a successful online business. Watch me build my websites and my YouTube channel to 500,000+ views per month and get all of my strategies.
Google Display Ads Video Playlist
If you prefer to go video by video, you can check out our playlist below. It is ordered so you can start with our step-by-step guide and then learn about different types of Display Ads and targeting.
 Subscribe To The Surfside PPC YouTube Channel
How to Create a Google Display Ads Campaign
Below is a step-by-step guide on how to create your first Google Display advertising campaign. If you prefer the video format, I would recommend watching the video tutorial above.
1. Open Google Ads and Sign-in to your Account
First, you will have to navigate to your Google Ads account. You can use an existing Google account to sign up for an Ads account.

2. Set-up Google Ads Conversion Tracking
You can watch our video below to learn how to set-up conversion tracking in your account. You can either use the Google Ads pixel, Google Analytics, and/or Google Tag Manager to create your conversions. The reason you want to utilize conversion tracking is because you can optimize your budget for key events like leads and sales for your business.
![]()
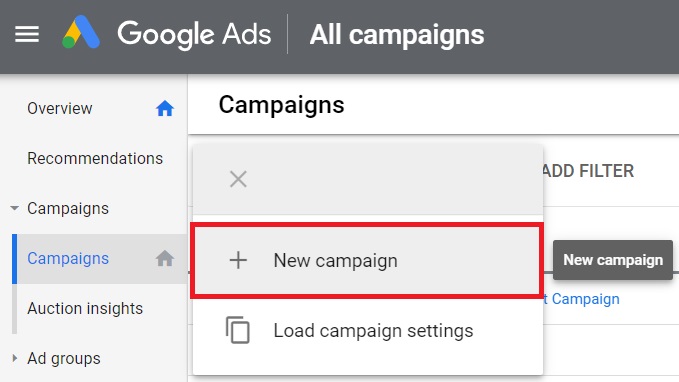
3. Create New Google Ads Campaign
Once you have conversion tracking set-up, you are ready to create your campaign.
4. Choose a Goal For Your Google Display Network Advertising Campaign
First, you want to choose a goal. At this point, if you are using conversion tracking, you should select Sales or Leads as your goal. If you are not using conversion tracking then I would recommend using the Website Traffic goal.

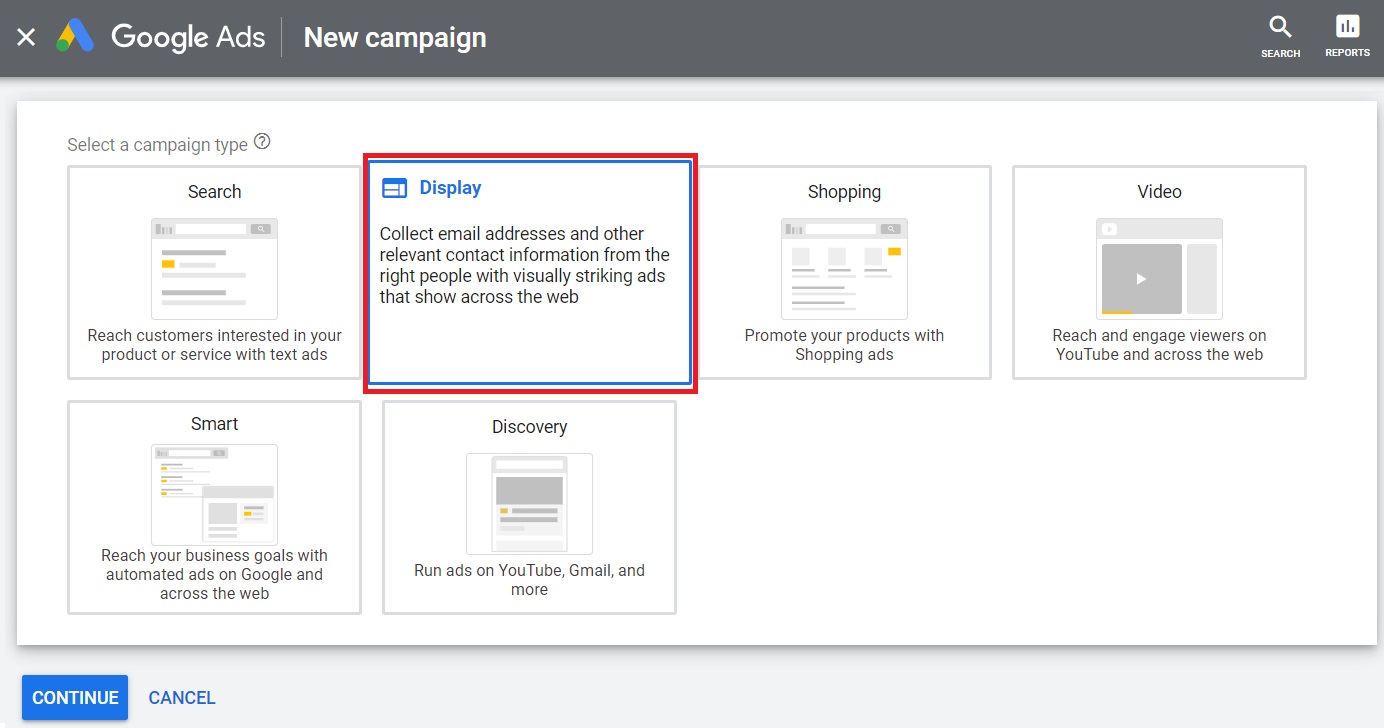
5. Choose The ‘Display’ Campaign Type
In order to run a Display Network campaign, you will have to choose the ‘Display’ campaign type.
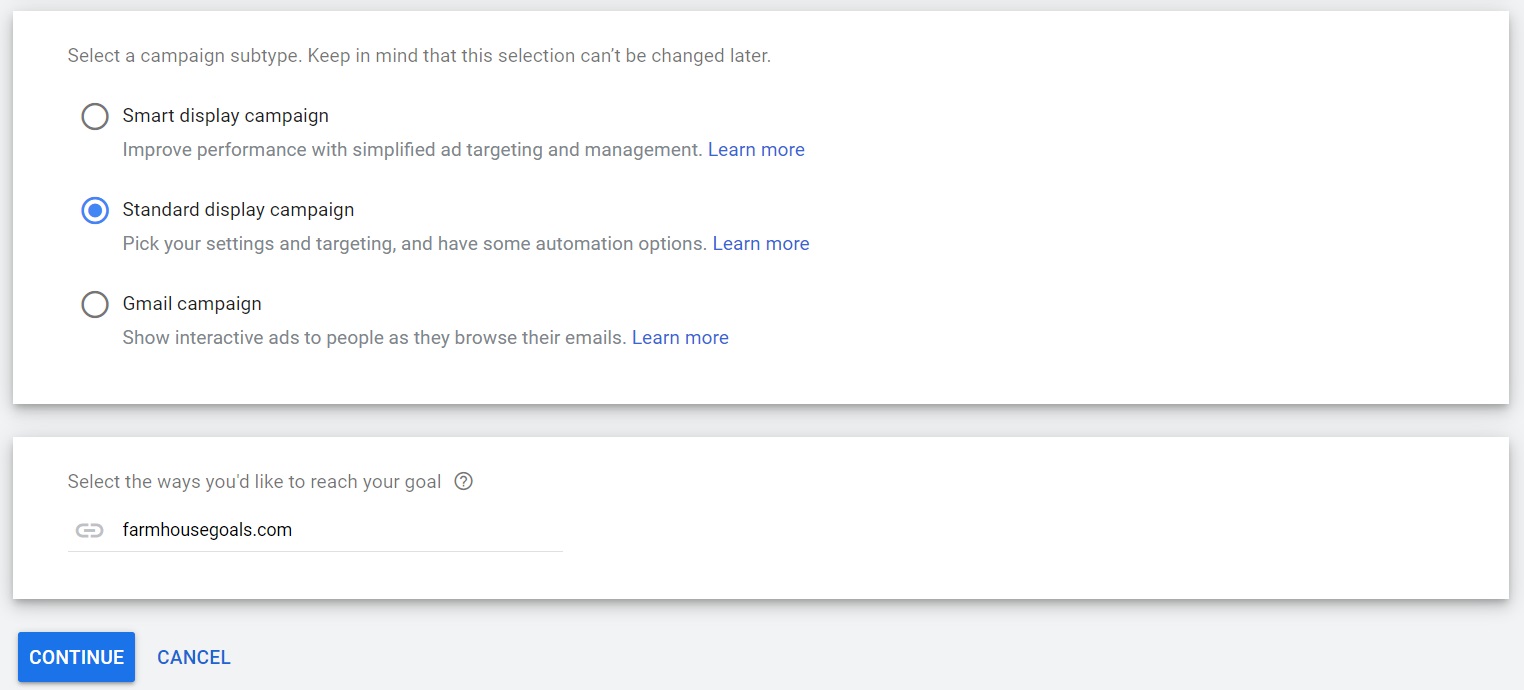
6. Choose one of the Display Campaign Sub-types
Right now, you can choose between Standard campaigns, Smart campaigns, and Gmail campaigns. If you want to set your own targeting and Remarketing audiences, I would recommend Standard Display campaigns. Smart Display campaigns are worth testing because that campaign type can help you drive more conversions within your budget.
7. Set Your Location Targeting and Language Targeting
What languages do your customers speak? What locations are your customers located? Use that information to set your locations and languages for your campaign.

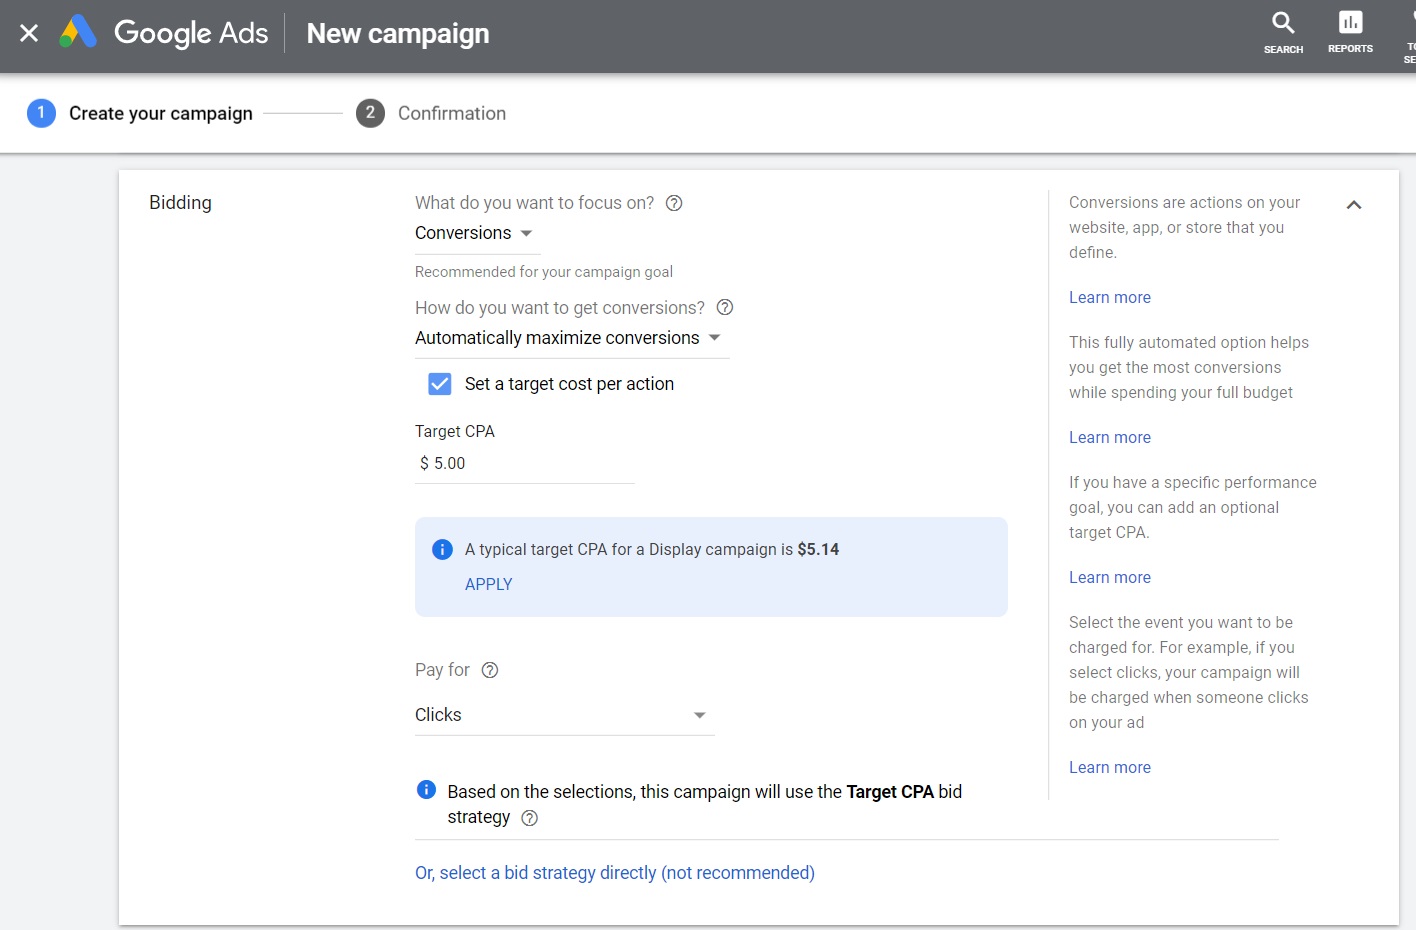
8. Set Your Google Display Ads Bid Strategy
If you are using conversion tracking, then you likely want to use a smart bidding strategy like Target CPA, Target ROAS, Maximize Conversions, or Maximize Conversion Value. You can start your campaign using Manual Enhanced CPC and then switch a smart strategy.
9. Set Your Daily Budget
What I would recommend doing is taking your monthly budget, dividing it by 30, and using that number as your daily budget.

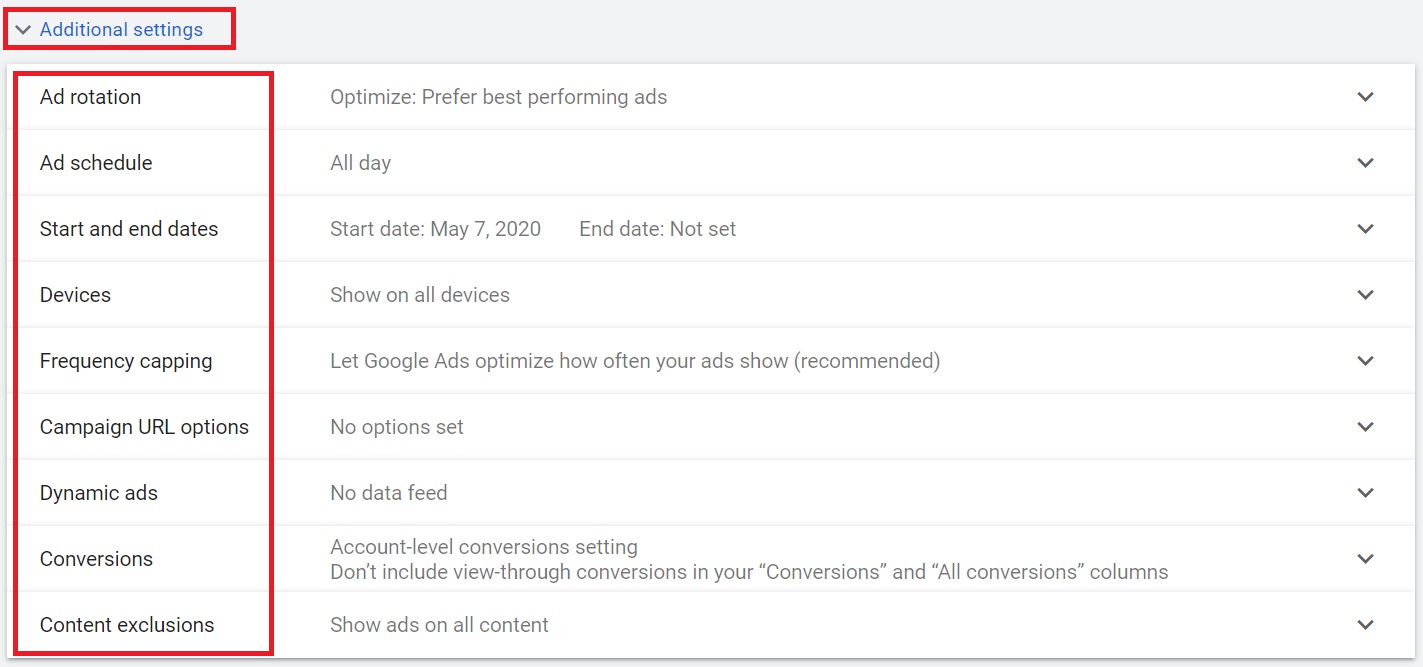
10. Adjust Additional Settings for your Campaign
There are different settings you can choose for your campaign including your Ad Rotation, Ad Schedule, Start and End Dates, Devices, Frequency Capping, Conversions, Content Exclusions, and more.
11. Name Your Ad Group
I would recommend naming your Ad Group based on the audiences and content you will be targeting.

12. Set Audience Targeting and Demographics Targeting
Next, you want to set your audience targeting and narrow it down to specific demographics as well. In terms of audiences, you can target detailed demographics, affinity audiences, custom affinity audiences, in-market audiences, custom intent audiences, similar audiences, life events, and Remarketing audiences.

13. Set Your Content Targeting
Next, you can set your content targeting to make sure your ads appear on certain websites, videos, and apps. You can also incorporate topics to make sure you are only reaching content with your ads that is about specific topics.

14. Set Your Targeting Expansion
One option you have is to use targeting expansion, which will allow Google Ads to find additional customers that are very similar to the audiences you are targeting. It is highly recommended for high budget campaigns and should be tested for campaigns with smaller budgets.

15. Create Responsive Display Ads and Upload Display Ads
Responsive display ads are the default display advertisement that will show for your campaign. You can also upload your own advertisements, but you should definitely start with Responsive Display Ads.

16. Create Campaign to Launch it
Once you have your bid strategy set, targeting set, budget set, campaign settings, and your ads created, you are ready to create and launch your campaign.

Google Display Ads Strategy
There are plenty of strategies you can employ on the Google Display Network. If you are focused solely on driving conversions, then you should focus on Remarketing ads. If however, you want to drive more brand and product awareness, then utilizing custom intent and in-market audiences can be part of your strategy as well. You can watch the embedded video below to learn more about setting a Google Display Network advertising strategy.
Google Display Ads Strategy Video Tutorial
Google Display Ads Targeting
You can target a variety of audiences as well as content across the Google Display Network. First off, you can target Remarketing audiences based on people who have visited your website, watched your YouTube videos, or used your mobile app. There are interest audiences based on different factors, demographic categories, life events, similar audiences based on your Remarketing lists, and more.
In addition, you can target specific websites, YouTube channels, YouTube videos, and mobile apps with your advertisements. For example, you know that people who visit finance websites will be likely to be interested in finance and investment products and services.
Google Display Ads Targeting Video Tutorial
Google Responsive Display Ads
The standard ad format for Google Display Advertising campaigns is the responsive display ad type. They allow you to reach a wider audience, fill more ad inventory, create hundreds of ad variations with 1 advertisement, and give you optimal performance. You can click our link below or watch the embedded video to learn more.
Learn more about Responsive Display Ads here.
Google Responsive Display Ads Video Tutorial
Google Display Ads Remarketing
One of the best audience segments you can target are Your Data segments, which is also referred to as Remarketing. When someone visits your website, watches a video from your YouTube channel, downloads your mobile app, or joins your customer list, you can target them with Google Display Ads. The video tutorial below will give you a step-by-step guide to creating Your Data segments and targeting them.
Optimize Google Display Advertising Campaigns
Optimization is one of the most important aspects of your Google Display Ads campaigns. In the video below, I go over how to optimize landing pages, responsive display ads, targeting, audience segments, and more. It can be difficult to improve an existing campaign, but these Goole Display optimization tips will be very helpful when you want to improve your results.
Google Discovery Ads Tutorial
While they don’t run on the Google Display Network, you can create ads that run in the Google Discover feed and in Gmail inboxes through your Google Ads account. These ads will run at the top of the ‘Social’ and ‘Promotions’ tabs. And, you can take advantage of the Google Display Network targeting audiences like Remarketing, In-Market segments, Custom segments, and more.
You can learn more about Gmail Ads here.
In Summary
When you get started with Google Display Ads, you need to understand some strategies, targeting, ads, and best practices. The video tutorials above will help you understand the Google Display Network, but you need to take it one step at a time. Whether you want to run standard display ads on websites, Remarketing ads, Gmail ads, and/or responsive display ads, the information above should be useful.


?")